

To install an infant car seat base in a U.S. vehicle, place it rear-facing in the back seat, attach it with either the vehicle seat belt or the lower anchors, set the correct recline angle, and tighten it until the base moves less than 1 inch from side to side or front to back when tested at the belt path. Always follow both the car seat manual and the vehicle owner’s manual.
A correct installation should feel firm, sit at the angle shown by the car seat’s indicator, and allow the carrier to click into the base without pressing against the front seat. The safest installation method is the one that fits your vehicle, follows the manuals, and can be tightened correctly.

Before You Install the Infant Car Seat Base
Read the manuals before you begin. The car seat manual explains how to use the base, belt path, recline foot, lock-off, and lower-anchor connectors. The vehicle manual shows where approved lower anchors are located and explains which seating positions may be used.
For most U.S. infant car seats, the base must be installed:
- In a rear-facing position
- In the vehicle’s back seat - With the correct recline angle
- With either the lower anchors or the vehicle seat belt
- Without an unsecured base or loose installation
- With the carrier fully locked into the base
Avoid placing a rear-facing infant seat in front of an active passenger air bag. If the vehicle has no back seat, contact the vehicle maker and car seat maker before using the front seat.
Check the car seat and vehicle
Before installation, confirm these points:
- The car seat has not expired. Look for the date printed on the seat or contact the manufacturer.
- The seat has no recall or damage. Check the manufacturer’s current recall information.
- The base matches the carrier. Many infant seats use model-specific bases. Do not mix parts from different brands or models.
- The vehicle seat is suitable. A deeply contoured or sharply sloped seat may affect the fit.
- The base can sit flat. Do not place towels, pool noodles, cushions, or other items under the base unless the car seat manufacturer specifically allows them.
- The seat belt or lower anchors are usable in that position. A visible anchor is not always approved for every seating location.
A used car seat needs extra care. Do not use one if you cannot confirm its history, if it has been in a moderate or severe crash, if parts are missing, or if the label and instructions are gone.

Choose the Right Installation Method
Use either the lower anchors or the vehicle seat belt unless the car seat manual and vehicle manual specifically allow another setup. Using both systems together does not automatically make the installation safer.
Option 1: Lower anchors
Lower anchors are small metal bars built into the crease between the vehicle seat back and cushion. They are part of the LATCH system, which stands for Lower Anchors and Tethers for Children.
For an infant car seat base:
- Find the approved lower anchors for the seating position.
- Attach the base connectors to the anchors.
- Make sure each connector is fully engaged.
- Keep the connector straps flat and untwisted.
- Tighten the straps while pressing the base down into the vehicle seat.
- Check the car seat manual for the child-weight limit of the lower-anchor system.
Do not confuse lower anchors with the top tether anchor. Infant car seat bases usually use lower anchors or the seat belt. The top tether is generally used with forward-facing child restraints, but the manual controls the exact setup.
Option 2: Vehicle seat belt
A seat belt can provide a secure installation when routed through the correct belt path and locked as required. This method is often useful when:
- The vehicle has no lower anchors in the chosen position.
- The center position has no approved lower anchors.
- The lower-anchor limit has been reached.
- The seat belt gives a better fit than the lower anchors.
A seat belt may lock in several ways. The vehicle may have a switchable retractor, a locking latch plate, or the car seat base may have a built-in lock-off. Use only the method described in the manuals.
Do not twist the seat belt unless the manual allows it. Do not route the belt over the base when the instructions show a path through the base.

Step-by-Step: How to Install an Infant Car Seat Base
The steps below cover the most common U.S. infant car seat bases. Your model may use different labels or parts, so compare each step with the manuals.
1. Select a rear seating position
Choose a back-seat position that allows the base to sit level and secure. The center position is not automatically the safest or best position. Use it only if the vehicle and car seat manuals allow installation there.
A position behind the driver or front passenger may be easier to use. The deciding factor is not the side itself. It is whether the base fits correctly and can be tightened without touching unsafe parts of the vehicle.
2. Open or prepare the belt path
Place the base on the vehicle seat with the recline foot facing the front of the vehicle. Find the rear-facing belt path marked on the base.
Some bases have a belt lock-off under a cover. Open it if the instructions require this. Other bases use the vehicle seat belt’s locking system instead.
Keep the base centered on the seating position. Do not let the base hang partly off the vehicle seat unless the car seat manual gives a specific allowance.
3. Set the recline angle
Adjust the recline foot or angle position until the indicator shows the correct range for your child or installation surface.
The angle matters because an infant’s head can fall forward if the seat is too upright. A seat that is too reclined may also fit poorly or take up more space than allowed.
Check the angle while the vehicle is parked on level ground. Recheck it after tightening because pressing down on the base can change the angle.
4. Attach the base with lower anchors or the seat belt
If using lower anchors
- Locate the lower anchors.
- Pull the lower-anchor connectors out of their storage area.
- Attach each connector to the correct anchor.
- Confirm that each connector is fully attached.
- Press the base down near the belt path.
- Pull the adjustment straps until the base is tight.
- Keep the straps flat and free of twists.
If using the vehicle seat belt
- Route the lap belt, or the lap-and-shoulder belt as directed, through the rear-facing belt path.
- Make sure the belt is not twisted.
- Buckle the belt.
- Lock the belt using the vehicle’s approved locking method or the base’s built-in lock-off.
- Press down on the base near the belt path.
- Remove slack from the belt.
- Close the lock-off if the base uses one.
The shoulder belt may need to remain in a specific position after the lap portion is tight. Some bases require the shoulder belt to pass through the lock-off, while others require a different route. Do not guess.
5. Tighten the base
Use firm pressure directly over the belt path while tightening. A common mistake is to push on the front or back of the base. That can make the base look tight while leaving slack at the belt path.
You may use your body weight to press down on the base during tightening, but do not force the base into a position that changes the recline indicator. Never add aftermarket straps or devices to improve tightness.
6. Check movement at the belt path
Hold the base with one hand at the belt path. Try to move it from side to side and front to back.
The base should move less than 1 inch in any direction when tested at the belt path. Small movement at the far end of the base may be normal. Do not use the loose end of the base as the test point.
If the base moves more than 1 inch:
- Remove slack from the belt or lower-anchor strap.
- Press down closer to the belt path.
- Check that the belt is in the correct path.
- Confirm that the lock-off or vehicle belt lock is working.
- Check the recline angle again.
- Try another approved seating position or installation method.

How to Install the Base With LATCH or Lower Anchors
Lower-anchor installation can be quick, but the connectors must attach to the correct anchors. They should not be connected to cargo hooks, top-tether anchors, seat-belt hardware, or other metal loops.
Follow this sequence:
- Confirm that the chosen seating position has lower anchors.
- Check the child-weight limit listed by the car seat manufacturer.
- Place the base on the seat.
- Set the recline angle.
- Attach both lower-anchor connectors.
- Tighten the connector straps evenly.
- Test movement at the belt path.
- Confirm that the carrier locks into the base.
Many vehicles have lower anchors only in the outer rear seating positions. Do not borrow an anchor from the left or right position to install the base in the center unless both manuals specifically allow it. Anchors that are close together are not automatically approved for center use.
When the child reaches the lower-anchor weight limit, reinstall the base with the vehicle seat belt if the seat remains within its usable limits. The exact limit varies by car seat model, so use the manual rather than a general chart.

How to Install the Base With a Seat Belt
A seat belt installation depends on the belt design in your vehicle and the features on the base. The goal is to create a locked, tight connection through the correct belt path.
Common seat-belt locking methods
| Locking method | What it means | What to check |
|---|---|---|
| Built-in base lock-off | The base clamps the belt in place | The belt sits fully inside the lock-off and the cover closes |
| Switchable retractor | Pulling the belt all the way out changes it to a child-restraint mode | The belt stays tight as it retracts |
| Locking latch plate | The buckle plate holds the lap portion when the belt is tight | The belt does not slide freely through the latch plate |
| Sliding latch plate with no locking feature | The latch plate may allow belt movement | The manual may require a locking clip or another approved method |
A locking clip is not a universal fix. Use one only when the car seat or vehicle instructions call for it, and place it exactly as shown. A locking clip installed in the wrong location can loosen the restraint.
Do not rely on the shoulder belt alone to hold the base. The belt must follow the car seat’s stated routing and lock as required.

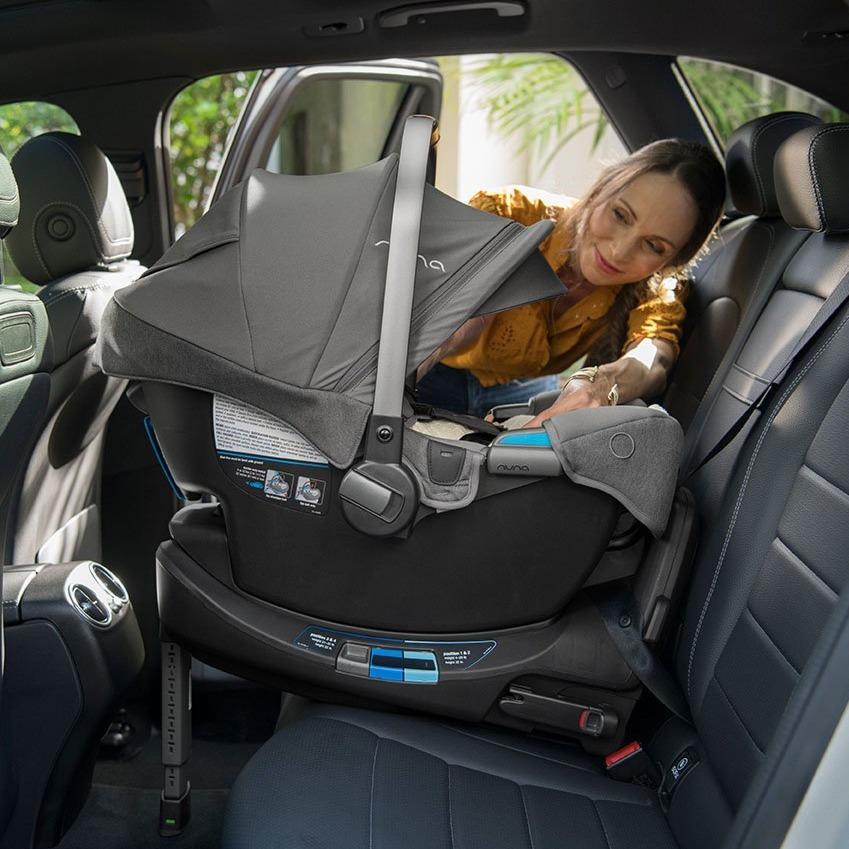
How to Attach the Infant Carrier to the Base
After the base is secure, place the infant carrier into the base according to the carrier manual.
Usually, you will:
- Hold the carrier by its approved handles.
- Align the carrier with the base.
- Lower the carrier until it clicks.
- Pull up on the carrier to confirm that it is locked.
- Check the carrier’s recline or angle indicator if the model has one.
The carrier should not sit loosely on the base. If it does not click, remove it and inspect the base for objects, damaged parts, or an incorrect carrier position.
A secure base does not replace a secure harness. Place the child in the carrier and adjust the harness according to the carrier manual. The harness should lie flat and snug, with no bulky coat between the child and the straps.
Signs the Infant Car Seat Base Is Installed Correctly
Use this short final check before each trip:
- The base is in an approved rear seating position.
- The base is rear-facing.
- The recline indicator is in the correct range.
- The base moves less than 1 inch at the belt path.
- The lower-anchor connectors or seat belt are fully attached.
- The belt or straps are not twisted.
- The base is not resting on an unapproved cushion or object.
- The carrier clicks into the base.
- Pulling up on the carrier does not release it.
- The front vehicle seat does not press against the carrier.
- No active air bag is in front of the rear-facing seat.
- The harness is snug when the child is secured.
The most useful test is simple: check the base at the belt path, not at the far end. A little movement at the end can be misleading. A large amount of movement at the belt path means the installation needs correction.

Common Infant Car Seat Base Installation Mistakes
Using both LATCH and the seat belt without approval
More attachment points do not always mean more protection. Combining systems can change how the base performs in a crash. Use the method approved by the manuals.
Installing the base too loosely
A base can look level and still be loose. Always perform the less-than-1-inch movement test at the belt path.
Using the wrong belt path
Rear-facing and forward-facing belt paths are different on many child restraints. Follow the labels on the base and the instructions for that exact model.
Ignoring the recline indicator
A tight base can still be at the wrong angle. Check the indicator before and after tightening.
Using an unapproved center installation
Many parents assume the center is always safest. In practice, the best position is an approved location where the base fits securely and can be used correctly.
Adding thick padding
Aftermarket inserts, head supports, seat protectors, and padding can affect the fit or performance of the restraint. Use only parts supplied with the car seat or approved in writing by the manufacturer.
Leaving a coat under the harness
Bulky clothing can create extra space between the child and harness. Dress the child in thin layers and place a blanket over the secured harness if needed.
Forgetting to check the carrier connection
A secure base is not enough. The carrier must be fully attached and locked each time it is placed in the base.

What to Do if the Base Will Not Tighten
If the base still moves more than 1 inch, stop and change one factor at a time.
- Remove the base and inspect the belt path.
- Confirm that you are using the correct seating position.
- Check the vehicle manual for the approved locking method.
- Check the car seat manual for the correct belt route.
- Reinstall while pressing down directly over the belt path.
- Try the other approved method: lower anchors or seat belt.
- Try another approved rear seating position.
- Contact the car seat manufacturer if the instructions conflict.
- Visit a certified child passenger safety technician for an in-person check.
A seat-belt installation that does not work in one seating position may work well in another. The lower anchors may also fit differently from the seat belt. Do not force a poor fit or use an improvised solution.
Free or low-cost installation help may be available through a local inspection station, fire department, hospital, public health agency, or community program. Call first. Not every station offers car seat checks, and some require an appointment.

Can You Install an Infant Car Seat Base in the Middle Seat?
You can install the base in the middle seat only when the vehicle and car seat instructions allow it. Some vehicles do not have lower anchors in the center. In that case, a seat belt may be the correct method.
Do not connect the base to outboard lower anchors to create a center installation unless the manufacturer specifically permits that setup. Anchor spacing differs between vehicles, and nearby anchors are not automatically approved for use together.
The middle seat can reduce a child’s distance from a side impact, but a secure installation matters more than choosing the center position at all costs. Use the position that gives the best approved fit and allows correct daily use.

When Should You Use a Certified Car Seat Technician?
Ask a certified child passenger safety technician for help when:
- The base will not pass the movement test.
- The vehicle manual and car seat manual seem to conflict.
- You are unsure how the seat belt locks.
- The center position is difficult to interpret.
- The carrier does not lock into the base.
- The seat touches the front vehicle seat.
- The base sits on a steep or unusual vehicle cushion.
- The car seat has been in a crash.
- You are using a used seat with an uncertain history.
A technician can check the installation in your actual vehicle. This is more useful than relying on a general video because fit depends on the exact car seat, base, vehicle, and seating position.

Infant Car Seat Base FAQ
Is it safer to use LATCH or a seat belt?
Neither method is automatically safer when both are installed correctly. Use the method that the manuals approve and that gives a tight, stable fit in your vehicle. A seat belt is often the better choice when lower anchors are unavailable or the child reaches the lower-anchor limit.
Should the infant car seat base touch the vehicle seat in front of it?
The base or carrier should not press against the front seat unless the car seat and vehicle manufacturers expressly allow that contact. Leave the space required by the manuals. A front seat can interfere with the recline angle or transfer crash forces in an unintended way.
Can I use a towel under the infant car seat base?
Only if the car seat manufacturer allows it. Some manuals permit a tightly rolled towel or approved item to correct a vehicle-seat angle, while others do not. Never use a loose cushion, thick pad, or improvised support without checking the manual.
Can I install an infant car seat in the front seat?
A rear-facing infant seat should not be placed in front of an active passenger air bag. The back seat is the preferred location. If a front-seat installation is unavoidable, follow the vehicle and car seat manuals and disable the air bag only as directed by the vehicle manufacturer.
Do I need to reinstall the base every time I use the carrier?
No, not if the base remains installed correctly and the carrier locks into it. Check the base and carrier connection each time. Reinstall the base if it becomes loose, the seating position changes, or the vehicle or car seat instructions require a new setup.
Is a seat protector safe under the base?
Only use a protector approved by the car seat manufacturer. A thick or slippery protector can change how the base contacts the vehicle seat. If you use one, repeat the movement and recline checks.
Final Checklist
Installing an infant car seat base is a process of fit, angle, and tightness. Read both manuals, choose an approved rear seating position, use one approved attachment method, set the correct recline angle, and test movement at the belt path.
If the base moves more than 1 inch, the carrier does not lock, or the instructions are unclear, do not use the setup for travel. Reinstall it, contact the manufacturer, or get an in-person check from a certified child passenger safety technician.
Official Sources and Further Help
- National Highway Traffic Safety Administration: Car Seats and Booster Seats
- NHTSA: Find a Car Seat Inspection Station
- American Academy of Pediatrics: Car Seats: Information for Families
- Safe Kids Worldwide: Car Seat Safety