

Installing a Graco car seat base in a U.S. vehicle usually takes a few minutes. You can secure most Graco infant seat bases with either the vehicle seat belt or the lower anchors in the LATCH system. The safest method is the one allowed by your exact Graco model and vehicle, followed by a firm fit check.
Before you begin, read both manuals:
- The instruction manual for your Graco car seat and base
- The owner’s manual for your vehicle


Models differ. A Graco SnugRide base may use a recline foot, built-in belt lock-off, level indicator, or LATCH strap that another model does not have.

What You Need Before Installing the Graco Base
Gather the car seat base, the infant carrier, both manuals, and your vehicle’s owner’s manual. Install the base in the vehicle where your child will ride. A flat, stable vehicle seat is best.
Check these points first:
- Confirm that the base matches your Graco infant car seat.
- Check the labels for the model name and expiration date.
- Look for recalls at NHTSA.gov/recalls.
- Remove thick coats, towels, and aftermarket padding from under the base.
- Make sure the vehicle seat is not damaged or unusually shaped.
- Park on a level surface if possible.
Do not install a rear-facing infant base in front of an active passenger air bag. The back seat is the usual location for a rear-facing car seat.
Check Base and Carrier Compatibility
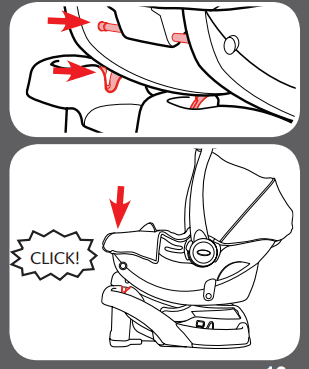
The infant carrier should click into the base without force. The carrier’s release handle should lock it in place, and the carrier should not lift out when you pull upward without pressing the release.
If the carrier does not click in, stop. Do not use a base that belongs to another model unless Graco lists it as compatible. A similar-looking base may not lock correctly.
Choose LATCH or the Seat Belt
LATCH means Lower Anchors and Tethers for Children. For a rear-facing infant base, you normally use the vehicle’s lower anchors or the vehicle seat belt. You do not use the top tether for a rear-facing infant base unless your Graco and vehicle manuals specifically direct you to do so.
Use one approved installation method at a time:
- LATCH: Connect the base to the vehicle’s lower anchors.
- Seat belt: Route the belt through the base’s marked belt path.
- Both together: Use both only if the Graco manual and vehicle manual specifically allow it.
LATCH is not automatically safer than a seat belt. A correct, tight installation matters more than which method you choose.
How to Install a Graco Car Seat Base With LATCH
Use the LATCH method only in a seating position with approved lower anchors. Check your vehicle manual for the anchor locations and weight limits. In many vehicles, the lower anchors are marked by small buttons or symbols near the crease between the seat cushion and seatback.


1. Place the Base Rear-Facing
Set the Graco base flat on the vehicle seat. The recline foot should face the front of the vehicle, while the carrier will face the rear when attached.
Make sure no part of the base hangs over the front edge of the vehicle seat beyond the amount allowed by your Graco manual. The base should sit on a firm part of the cushion.
2. Set the Recline angle
adjust the recline foot or recline position until the base’s level indicator shows the correct range for your child’s age or size.
Many Graco bases use a bubble or colored indicator. The correct position can change as your child grows. Follow the indicator and the printed instructions on the base. Do not guess based only on whether the base looks level.
If the vehicle seat slopes sharply, adjust the approved recline mechanism. Do not place towels, pool noodles, or other objects under the base unless Graco specifically permits that method for your model.
3. Extend the LATCH Strap
Pull the LATCH strap from its storage area. Make sure the strap is not twisted.
Attach each connector to the vehicle’s lower anchor. The connector should face the correct direction and lock onto the anchor. Tug each connector to confirm that it is attached.
Keep the strap inside the correct LATCH belt path shown on the base. Do not route it through a belt path meant only for the vehicle seat belt.
4. Tighten the LATCH Strap
Press down firmly on the center of the base while pulling the free end of the LATCH strap. Tighten the strap until the base sits firmly against the vehicle seat.
Avoid pulling from the side. Pulling straight along the strap gives better tension and helps prevent the base from shifting.
If your base has a lock-off, close it only after the strap is tight and routed correctly. Never force the lock-off over a twisted or misplaced strap.
5. Check for Movement
Hold the base at the belt path with your non-dominant hand. Move it from side to side and front to back.
The base should move no more than 1 inch in any direction when measured at the belt path. Movement at the front or rear of the base may look larger and does not give the same result as movement at the belt path.
If the base moves too much:
- Open the lock-off, if present.
- Loosen the LATCH strap slightly.
- Recenter the base.
- Press down on the base.
- Pull the strap tight again.
- Recheck the level indicator and movement.

How to Install a Graco Car Seat Base With a Seat Belt
A seat belt can provide a secure installation when it is routed through the correct belt path and locked properly. This method is useful when the seating position has no lower anchors or when the seat belt gives a better fit.


1. Place and Level the Base
Put the base rear-facing on the vehicle seat. Adjust the recline foot until the level indicator shows the correct range.
Keep the base centered in the seating position when possible. Some vehicle seats have a raised center, deep side bolsters, or a split cushion that can make a stable installation difficult.
2. Route the Seat Belt
Thread the vehicle lap belt, or the lap portion of a lap-and-shoulder belt, through the rear-facing belt path marked on the Graco base.
The belt must lie flat. It should not be twisted, trapped under the base, or routed through the wrong opening.
If the base has a built-in lock-off, follow the manual’s instructions for placing the belt inside it. A lock-off holds the belt tight without requiring you to use the vehicle’s own retractor lock.
3. Lock the Vehicle Belt
If you are not using a base lock-off, use the vehicle’s approved method to keep the belt tight. Common methods include:
- Switching a shoulder-belt retractor to locked mode
- Using a locking latch plate
- Using a belt-shortening or locking feature described in the vehicle manual
The exact method depends on the vehicle. Do not assume that pulling the shoulder belt all the way out will lock every vehicle belt in the same way.
After the belt is tight, let the unused shoulder belt retract slowly. Check that the belt stays tight and does not loosen.
4. Tighten the Base
Press down firmly in the center of the base while removing slack from the belt. Close the lock-off if your model has one.
Do not use your knee or full body weight unless the Graco instructions allow it and you can keep the base correctly positioned. Excess force can change the angle or damage a part.
5. Perform the Movement Test
Hold the base near the vehicle belt path. Test it from side to side and front to back.
The base should move less than 1 inch at the belt path. If it moves more, remove slack and repeat the installation. If you still cannot obtain a tight fit, try another approved seating position or the other approved installation method.
6. Confirm the Seat Belt Is Not Pressing the Carrier Release
After installation, attach the infant carrier. Check that the vehicle belt, lock-off, and base parts do not block the carrier’s release mechanism.
The carrier should click into place. Lift up on the carrier without pressing the release handle. It should stay attached.


How to Attach the Graco Infant Carrier to the Base
Once the base is secure, place the infant carrier onto the base in the rear-facing position.
- Hold the carrier by its handle as directed by the Graco manual.
- Line up the carrier with the base.
- Lower the carrier until you hear or feel the attachment click.
- Check the red or green indicator, if your model has one.
- Pull up on the carrier without touching the release handle.
- Confirm that the carrier remains attached.
Do not use the carrier if it appears to sit unevenly, rocks on the base, or does not lock. Remove it and check for objects in the attachment area.
The carry handle position also varies by Graco model. Use the position shown in your manual and on the carrier label. Do not rely on a general rule from another car seat.
How to Check That the Installation Is Correct
A correct installation has several signs:
- The base is facing the rear of the vehicle.
- The recline indicator is in the allowed range.
- The base moves less than 1 inch at the belt path.
- The LATCH connectors or vehicle belt are attached correctly.
- The belt or LATCH strap is flat and untwisted.
- The carrier clicks fully into the base.
- The carrier stays attached when lifted without using the release handle.
- No part of the base rests on an unapproved object.
- The base does not press against the vehicle door in a way that changes its position.
A tight base is only part of safe use. The baby also needs a correct harness fit. The harness should lie flat, and the chest clip should sit at armpit level when the child is secured. Follow Graco’s instructions for harness height, buckle position, and clothing.
Have the installation checked by a certified Child Passenger Safety Technician if you are unsure. The National Highway Traffic Safety Administration child passenger safety page can help you find inspection resources in the United States.

Common Graco Car Seat Base Installation Problems
The Base Moves More Than 1 Inch
The belt or LATCH strap may still have slack. The base may also be sitting on a soft or uneven part of the vehicle seat.
Try this:
- Recheck the belt path.
- Press down near the belt path while tightening.
- Make sure the lock-off is fully closed.
- Check that the strap is not twisted.
- Try a different approved seating position.
- Try the other approved installation method.
Do not solve excess movement by wedging the base with unapproved objects.
The Level Indicator Is Not in the Correct Range
The vehicle seat may slope too much for the current recline setting. Adjust the Graco recline foot or position according to the manual.
If the indicator remains out of range, try another approved seating position. Do not change the angle by adding folded towels or other material unless your exact Graco instructions allow it.
The LATCH Connectors Will Not Attach
Check that you are using the vehicle’s lower anchors, not the top tether anchor. Confirm that the connectors are not upside down or blocked by the seat upholstery.


If the anchor spacing or connector type does not match, use the vehicle seat belt if the base allows that method.
The Lock-Off Will Not Close
A lock-off may not close when the belt is twisted, too loose, routed incorrectly, or thicker than the lock-off can hold.
Open the lock-off and start again. Follow the printed belt path. Do not force the lock-off or add tape, clips, or other parts that Graco did not provide.
The Carrier Does Not Click Into the Base
Check for:
- A base that does not match the carrier
- Dirt or objects in the attachment area
- An incorrect carrier angle
- A release handle that is not reset
- A damaged base or carrier
Never drive with the carrier resting on the base without a clear lock. If the parts do not connect correctly, contact Graco or stop using the damaged component.
The Vehicle Seat Belt Keeps Loosening
The belt may not be locked by the method required for that vehicle. Read the vehicle manual section on child restraint installation.
A built-in Graco lock-off may solve the problem if your model includes one. If the belt still loosens, use a certified technician or another approved seating position.
LATCH vs. Seat Belt: Which Installation Method Should You Use?
Choose the method that produces a tight, stable installation in your vehicle and is allowed by both manuals.
| Installation method | Useful when | Main check |
|---|---|---|
| LATCH | The seating position has approved lower anchors | Connectors are attached and the strap is tight |
| Seat belt | Lower anchors are unavailable or the belt fits better | The belt is locked and routed correctly |
| Both methods | Only when both manuals allow it | Follow the exact model instructions |
A lower-anchor installation does not remove the need to check the child’s weight and the restraint’s limits. Graco and vehicle manuals provide the controlling limits for your setup.
Never move LATCH connectors to a different seating position unless the vehicle manual permits it. Do not use inner anchor positions to create a center installation unless the vehicle maker specifically allows that use.
Important Safety Limits and Mistakes to Avoid
Avoid these common errors:
- Installing a rear-facing base in front of an active air bag
- Using a base that is not approved for the carrier
- Routing the belt through the wrong path
- Using LATCH and the seat belt together without permission
- Leaving the belt or LATCH strap twisted
- Using both lower anchors and the top tether without instructions
- Adding aftermarket inserts, pads, covers, or strap clips
- Placing a rolled towel or pool noodle under the base without model-specific approval
- Judging tightness by the front of the base instead of the belt path
- Letting a child wear a bulky coat under the harness
- Ignoring a cracked, missing, or damaged part
- Continuing to use a seat after its expiration date
- Assuming every Graco base installs the same way
The base manual controls when it differs from general advice. If the manual is missing, download the correct version from Graco using the model number printed on the product.

When to Get Help With Graco Base Installation
Ask for help when the base cannot become tight, the level indicator cannot reach its allowed range, or the carrier will not lock into place.


A certified Child Passenger Safety Technician can inspect the installation in person. Bring the car seat, base, and vehicle manual. For a damaged product, missing part, recall question, or compatibility concern, contact Graco customer support or the vehicle manufacturer.
A technician can help identify a good seating position, but they cannot override the instructions for the car seat or vehicle. Replace a restraint after a crash if Graco or the vehicle manufacturer says it must be replaced. Crash replacement rules can depend on the severity of the crash and the manufacturer’s guidance.

Frequently Asked Questions
Can I install a Graco car seat base in the middle rear seat?
Sometimes. The center position is suitable only when the vehicle manual allows that installation and the base can obtain a tight fit. Many vehicles do not have lower anchors in the center, so you may need to use the seat belt.
Do not attach LATCH connectors to anchors from two different seating positions. Use the center only if the vehicle and Graco instructions support it.
Should I use LATCH or the seat belt for a Graco base?
Use whichever approved method gives a secure installation in your vehicle. LATCH is not automatically safer, and a seat belt is not less safe when installed correctly.
Can I use both LATCH and the seat belt?
Only if the Graco manual and vehicle manual specifically allow it for your model and seating position. Otherwise, use one method.
How tight should the Graco car seat base be?
The base should move less than 1 inch side to side or front to back when you test it at the belt path. The level indicator must also be in the correct range.
Can I use a Graco base without the infant carrier?
The base can remain installed when the carrier is removed, but a child should not ride in the vehicle unless the carrier is fully attached and locked. A loose base should never be used as a stand or travel surface outside the vehicle.
Final Installation Checklist
Before your first trip, confirm the following:
- The base matches the Graco carrier.
- The base is rear-facing.
- The recline indicator is correct.
- The seat belt or LATCH strap uses the proper path.
- The belt or strap is tight, flat, and untwisted.
- The base moves less than 1 inch at the belt path.
- The carrier clicks into the base.
- The carrier stays attached during a lift test.
- The harness fits the child according to the Graco manual.
- The child rides in a safe rear seating position away from an active air bag.
When a Graco car seat base does not install correctly, do not drive and hope it will settle into place. Recheck the manuals, try the other approved method, or have the installation checked by a certified technician.