

Installing car seat covers in a U.S. vehicle is usually a simple job. Most covers fit over the seat cushion, seatback, headrest, and armrests. The key is to match the cover to your vehicle and keep every airbag, seat belt, lever, and control clear.
Before you begin, read the cover instructions and your vehicle owner’s manual. Some U.S. vehicles have side airbags inside the front seatbacks. A poorly designed cover can block the airbag or change how it deploys. Use only covers made for seats with side airbags, and look for a labeled tear seam.
Quick answer: Remove the headrests if the instructions allow it, place each cover over the correct seat section, align the seams, fasten the straps under the cushion, and check that all safety systems and seat functions work as intended.

What You Need Before Installing Car Seat Covers
You usually need only the seat covers, the supplied straps, and a few minutes of free space around the vehicle. A plastic trim tool can help with tucking fabric into seat gaps, but do not force it near wiring or sensors.
Gather these items:
- The correct car seat cover set
- The cover instructions
- Your vehicle owner’s manual
- A flashlight
- A plastic trim tool, if needed
- Mild soap and a clean cloth for dirty seats
- A small storage bag for removed headrest clips or parts
Park on a level surface. Turn off the vehicle and set the parking brake. Move the front seats forward or backward as needed so you can reach the areas below them.
Check the covers before installation. Look for:
- A left and right front seat cover
- Separate headrest covers
- Openings for headrest posts
- Slots for seat belts
- A marked side-airbag seam
- Straps, hooks, buckles, or elastic bands
- Separate pieces for split rear seats
- Openings for armrests or seat controls
Do not install a cover if the package does not clearly state that it fits your vehicle. A loose cover can bunch up, slide forward, or block controls.
Check Safety Features Before You Start
The most important check is the location of the side airbags. In many vehicles, a side-impact airbag is stored inside the outer edge of the front seatback. The exact location varies by make and model.
Look for a tag on the seat side that says “SRS,” “airbag,” or “side airbag.” Your owner’s manual may also show the airbag location. The seat cover must not cover, sew over, or seal this area unless the cover was designed to split there during deployment.
The National Highway Traffic Safety Administration explains that airbags are part of a vehicle’s restraint system. They work with seat belts, not as a replacement for them. This means a seat cover must not interfere with either system.
Check these items before fitting the cover:
- Front side-airbag outlets
- Seat belt buckles
- Seat belt anchors
- Seat-mounted wiring
- Occupant sensors
- Power seat switches
- Seat heaters and ventilation controls
- Folding rear-seat hinges
- LATCH anchors for child safety seats
Never tuck a strap around an electrical wire. Do not pull on yellow wiring or connectors. In most vehicles, yellow wiring relates to the airbag system.
If a cover blocks a seat belt buckle, airbag seam, child-seat anchor, or seat control, stop. Use a different cover or contact the cover maker.

How to Install Front Car Seat Covers
Install one seat at a time. This gives you a finished seat to use as a guide and reduces mix-ups between the driver and passenger covers.
1. Remove the headrest if allowed
Many headrests release when you press a small button near one post. Some need a key, tool, or special release method. Check the owner’s manual before removing one.
Do not remove a headrest by force. Some headrests include wires, active safety parts, or special locks.
Place the headrest on a clean surface. Keep the left and right covers separate.
2. Identify the top, bottom, and airbag side
Find the cover label or opening that shows the front, rear, left, or right side. The seams should match the shape of the seat.
The side-airbag seam normally belongs on the outer side of the seat. On a driver’s seat, this is usually the door side. On a passenger seat, it is also usually the door side.
Do not assume every vehicle uses the same airbag layout. Confirm it in the manual.
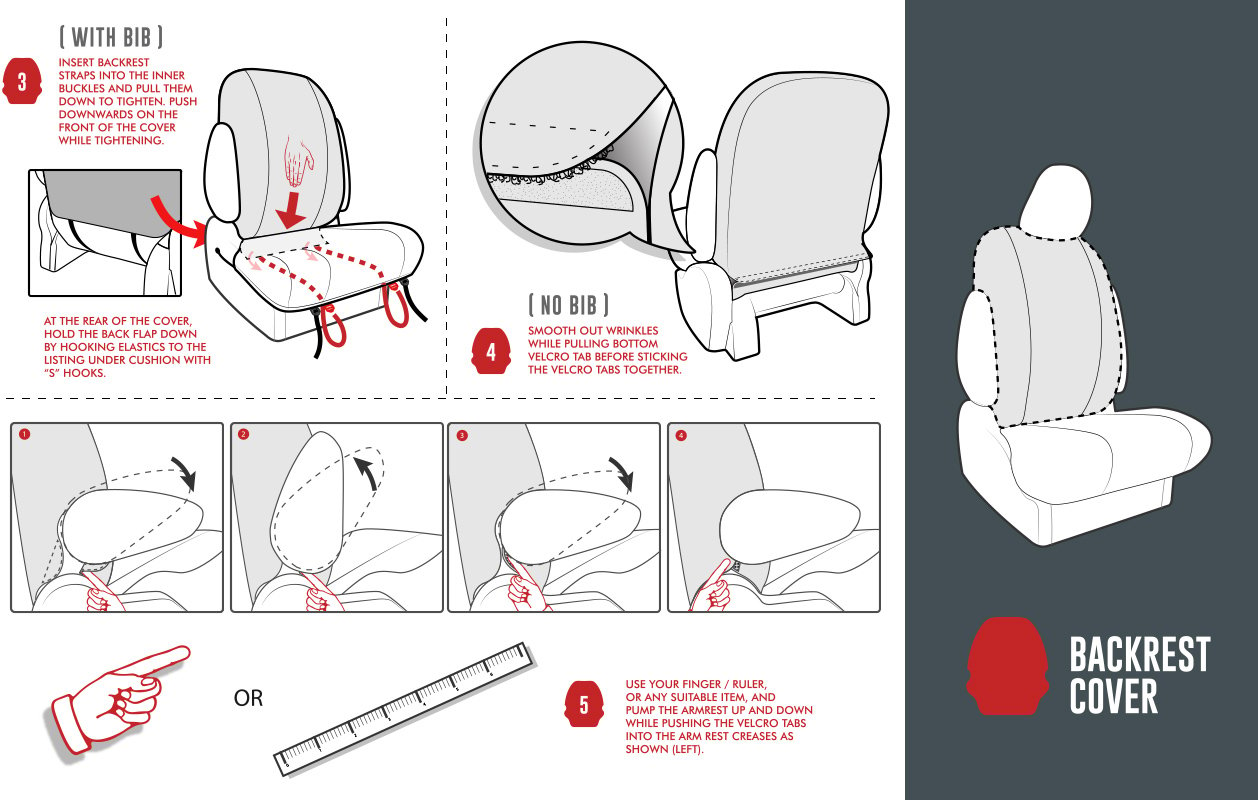
3. Fit the seatback cover
Slide the seatback cover down from the top. Keep the fabric straight as you work. Do not twist the cover or pull hard on a stitched airbag seam.
Smooth the cover over the shoulders and sides. Line up any openings with the seat belt guide, lever, or other parts.
If the cover has a zipper, close it only after the fabric is in the correct position. Do not use the zipper to force a cover over a seat that is too large.
4. Fit the seat cushion cover
Place the cushion section over the seat from front to back. Pull the cover evenly over both sides.
Tuck the rear edge into the gap between the seat cushion and seatback if the design calls for it. Use your hands first. A plastic trim tool can help, but keep it away from wires, sensors, and moving parts.
Do not push fabric deep into the seat gap. Some vehicles have pressure sensors or wiring below the cushion.
5. Attach the straps
Reach under the front and sides of the seat. Connect the supplied straps only where the instructions show.
Keep every strap away from:
- Seat tracks
- Power seat motors
- Seat belt anchors
- Wiring
- Sharp metal edges
- Folding mechanisms
Move the seat through its full range after fastening the straps. The straps must not tighten, snag, or rub against moving parts.
6. Refit the headrest
Slide the headrest posts through the correct openings. Push the headrest down until it locks.
Make sure the posts sit at the same height on both sides. A headrest cover should not stop the headrest from locking or moving as designed.

How to Install Rear Seat Covers
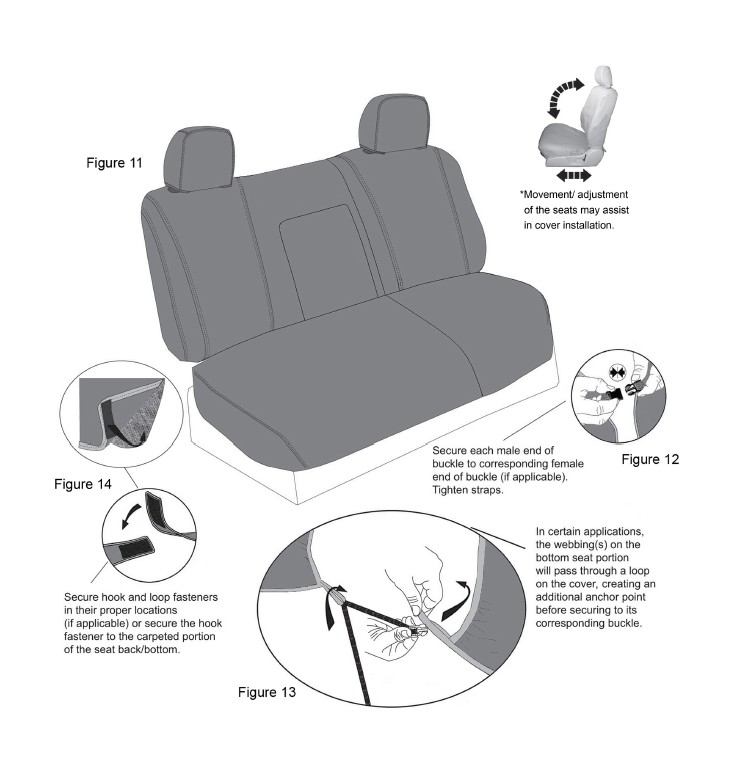
Rear seats vary more than front seats. A rear bench may be one piece, split 60/40, or divided into several folding sections. Identify how your seats fold before installing the covers.
Start with the smallest removable section. This helps you learn how the straps and openings work.
Follow these steps:
- Fold or release the rear seat according to the owner’s manual.
- Remove the rear headrests if the cover instructions permit it.
- Match each cover to the correct seat section.
- Align seams with the seat edges and folding lines.
- Pass seat belts through their proper openings.
- Keep the LATCH anchors visible and easy to reach.
- Attach straps without wrapping them around hinges or wiring.
- Fold and return the seat to its normal position.
- Check that the seat locks fully.
A rear cover must not hide the lower LATCH anchors or the top-tether anchor. The NHTSA child passenger safety guidance recommends using the vehicle and child-seat instructions together. A cover should never sit between a child restraint and the vehicle seat if it prevents a firm installation.
Do not place a thick, loose pad under a child car seat unless the child-seat maker specifically allows it. Extra material can change how the restraint contacts the vehicle seat.
Check each seat belt after installation. The belt should pull out, lock, retract, and buckle without rubbing against the cover.
How to Install Headrest, Armrest, and Console Covers
Small covers often affect comfort and function more than expected. Install them only after the main seat covers are in place.
Headrest covers
A headrest cover should fit tightly but must not stop the headrest from locking. Keep the release button and posts accessible if the design requires them.
After installation, adjust the headrest. It should move through its normal positions.
Armrest covers
Open the armrest and check its hinge before fitting the cover. The cover should not prevent the armrest from lifting, lowering, or latching.
Do not wrap a cover around a side-impact airbag area. Some front armrests are part of the seat structure, while others are attached to the door or center console.
Center console covers
A console cover should not block:
- Cup holders
- Storage lids
- USB ports
- Drive-mode controls
- Parking brake controls
- Shifter movement
- Vent openings
If the cover slips when you open the lid, it needs adjustment or may not fit that console.

How to Check the Installation
A good installation looks smooth and stays in place during normal seat use. It also leaves every safety feature available.
Use this final check:
- The cover fits the correct seat.
- Seams follow the seat shape.
- The airbag tear seam is on the correct side.
- No cover crosses an airbag label or outlet.
- Seat belt buckles are easy to reach.
- Seat belts pull, lock, and retract normally.
- Headrests lock at the correct height.
- Power seat controls work.
- Seat heaters and ventilation controls work.
- Seats slide without catching a strap.
- Folding rear seats lock in place.
- LATCH and top-tether anchors remain accessible.
- No warning light appears on the dashboard.
Test the seat with the vehicle parked. Move it forward, backward, up, and down if it has power adjustment. Recline the seat and return it upright.
Then sit in the seat and check for pressure points. A cover that feels tight in one area may be pulling against a seat control or internal part.
If the airbag warning light turns on, stop using the vehicle until the cause is checked. Do not disconnect or reconnect airbag wiring yourself. A qualified technician should inspect the system.

Common Car Seat Cover Installation Problems
Most problems come from a wrong fit, incorrect orientation, or straps placed near moving parts.
| Problem | Likely cause | What to do |
|---|---|---|
| The cover will not slide over the seat | Wrong size or wrong seat section | Confirm the label and vehicle fit |
| Fabric bunches at the rear | The cover is not tucked evenly | Remove it and center it again |
| The cover slips forward | Straps are loose or misplaced | Refit the cover and use only supplied straps |
| A zipper will not close | The cover is twisted or too small | Do not force it; check the fit |
| The seat control is blocked | The cover is not designed for that seat | Use a compatible cover |
| The airbag seam is on the wrong side | Left and right covers were switched | Remove and reinstall the correct cover |
| The seat belt is hard to reach | The opening is misaligned | Reposition the cover or stop using it |
| The seat will not fold | A strap or seam crosses the hinge | Remove the obstruction |
| An airbag light appears | Wiring may be disturbed or a sensor is affected | Stop and seek qualified service |
A loose fit is not always solved by tightening straps. The cover may have the wrong shape. Excess tension can also put stress on the fabric and seat parts.
If the cover has no clear airbag seam, do not assume it is safe for a seat-mounted side airbag. Ask the manufacturer for written compatibility information.

Special Cases to Consider
Some seats need extra care because they include features that a basic universal cover may not support.
Heated and ventilated seats
A cover can reduce airflow from a ventilated seat. It may also change how heat feels. Use a cover that the vehicle or cover maker approves for heated or ventilated seats.
Do not use a cover that traps heat or covers a seat ventilation intake.
Seats with occupancy sensors
Some passenger seats use sensors to detect weight or seat occupancy. A thick or poorly fitted cover may affect the seat surface. Follow the vehicle manual and the cover instructions.
If the airbag or passenger-seat warning changes after installation, remove the cover and have the system checked.
Leather and synthetic leather seats
Smooth surfaces can make covers slide more easily. Clean the seat first and tighten the cover evenly. Avoid sharp hooks that may scratch the surface.
Vehicles with built-in seat belts
Some rear seats have the belt built into the seatback. The cover must include the correct belt opening and must not restrict belt movement.
Fold-flat or removable seats
Install covers only if the seats can still fold, latch, and remove as designed. A cover that looks fine in the upright position may block a hinge when the seat moves.

How to Care for Installed Seat Covers
Care starts with the cover label. Follow its washing and drying instructions. Some covers can be machine washed, while others need spot cleaning.
Vacuum loose dirt before washing. Close zippers and fasteners so they do not catch. Avoid bleach unless the manufacturer permits it.
Check the fit every few weeks. Look for:
- Loose straps
- Torn seams
- Exposed hooks
- Blocked seat belts
- Shifted airbag seams
- Fabric near seat tracks
- Cover movement during entry or exit
Remove the cover if it tears near an airbag seam, blocks a restraint, or interferes with a seat control. Do not repair an airbag seam with ordinary stitching or adhesive.

Frequently Asked Questions
Can I install car seat covers without removing the seats?
Yes. Most covers install over the seats without removing them. You may need to move the seats or remove the headrests for a clean fit. Do not remove a seat unless the vehicle manual or a qualified technician provides a safe procedure.
Are universal car seat covers safe with side airbags?
Only if the cover is designed and labeled for seats with side airbags. The cover should have a planned tear seam on the correct side. A universal cover without clear airbag compatibility may interfere with deployment.
Should I put a cover under a child car seat?
Usually, no. A cover can reduce grip or change the contact between the child restraint and the vehicle seat. Follow both the vehicle manual and the child-seat manual. If the child seat moves more than allowed by its instructions, remove the cover.
Can seat covers damage heated seats?
They can interfere with heat transfer, and an unsuitable cover may trap heat. Use covers approved for heated seats. Stop using the cover if the seat becomes unusually hot or the controls behave differently.
Why do my car seat covers keep sliding?
The cover may be the wrong size, installed on the wrong seat, or missing a strap. Smooth leather can also make movement worse. Recenter the cover, secure the supplied straps away from moving parts, and replace it if it still shifts.
Final Safety Check
Car seat covers should fit snugly without hiding or restricting safety equipment. The best installation is not the tightest one. It is the one that keeps the airbag seam, seat belts, headrests, anchors, wiring, and seat controls fully usable.
Before driving, test the seat in every normal position. If anything feels forced, blocked, loose, or unusual, remove the cover and correct the fit. When an airbag light appears or wiring may be disturbed, have the vehicle inspected by a qualified technician.