

Introduction
You can repair a small tear in a car seat with a patch, upholstery thread, or a leather and vinyl repair kit. The right method depends on the seat material, tear size, tear location, and whether the seat has a side airbag or heating element.
This guide is for vehicle seats in cars and trucks sold in the United States. It does not cover child safety seats. Never sew, glue, or place a patch over an airbag seam. If the tear is near a side airbag, seat belt anchor, power control, or heated-seat element, have the seat checked by a qualified auto upholstery shop.

First, decide if the seat is safe to repair
A torn cover is often a cosmetic problem, but some damage can affect occupant protection. Before you pick up a needle or adhesive, inspect the whole seat.
Do not repair the seat yourself if:


- The tear is on a marked airbag seam.
- The seat has deployed an airbag.
- The seat frame, metal springs, or seat belt mount is damaged.
- The foam is badly crushed or missing.
- The tear is close to a seat belt anchor.
- A heated seat has exposed wires.
- You see a warning light on the dashboard.
- The seat cover must be removed to reach the damage.
- The seat is part of a child restraint system.
Many U.S. vehicles have a side-impact airbag inside the outer edge of the front seatback. Look for a small label such as SRS AIRBAG or AIRBAG. The label may be sewn into the cover. This seam must open in a controlled way during a crash. A thick patch, tight stitching, or strong adhesive can change how the airbag deploys.
The National Highway Traffic Safety Administration advises vehicle owners to follow the vehicle maker’s instructions when working around airbag systems. The owner’s manual may also warn against seat covers or repairs that interfere with side airbags.
Use this quick decision guide
| Damage | Best choice |
|---|---|
| Small cut in cloth, away from safety parts | Sew or patch it |
| Small tear in leather or vinyl | Use a backing patch and repair compound |
| Split seam with intact material | Restitch the seam |
| Large hole with missing material | Replace the upholstery panel or hire an upholsterer |
| Tear over a side airbag seam | Professional inspection |
| Exposed heated-seat wires | Stop using the heater and seek repair |
| Broken foam or frame | Professional seat repair |
A repair is successful only when it restores the cover without blocking safety features. A neat-looking patch is not enough.
Gather the right tools and materials
The material of the seat determines the repair method. Check the seat in good light. Cloth has a woven surface. Leather has a natural grain. Vinyl often has a smooth plastic surface with a printed grain.
For a cloth car seat
You may need:
- Upholstery thread
- A curved upholstery needle
- Sharp fabric scissors
- Matching cloth or denim for a backing patch
- Fabric adhesive
- Tweezers
- Rubbing alcohol
- A soft brush
- A vacuum
use upholstery thread rather than normal sewing thread. It is thicker and better suited to the strain found on a vehicle seat.
For a leather or vinyl car seat
You may need:
- A leather and vinyl repair kit
- Matching flexible filler
- A backing fabric
- Small scissors
- Fine-grit sandpaper, often 320 to 600 grit
- Rubbing alcohol
- Cotton swabs
- A small spatula or plastic card
- Grain paper or a grain pad
- Color compound or dye made for automotive upholstery


A repair kit should remain flexible after it cures. Household caulk, super glue, and hard epoxy can crack when the seat bends.
For a split seam
You may need:
- Upholstery thread
- A curved needle
- Seam clips or small clamps
- A seam ripper
- Matching fabric, leather, or vinyl
- A small amount of flexible adhesive
Do not pull the seam tight enough to distort the seat cover. The cover needs some movement when a person sits down.
Clean and prepare the torn area
Clean the area before you repair it. Dirt, skin oil, and wax can keep glue or filler from bonding.
- Vacuum loose dirt from the seat.
- Wipe leather or vinyl with a cleaner made for that material.
- Use a small amount of rubbing alcohol on a cloth if the surface has oily residue.
- Test the cleaner in a hidden spot first.
- Let the area dry fully.
- Trim loose threads and ragged fibers with sharp scissors.
- Do not enlarge the tear while trimming.
Avoid soaking the seat. Water can move into the foam and may reach electrical parts below the cushion.
If the tear has curled edges, flatten them gently with your fingers. Do not stretch the material. Stretching can leave a permanent wrinkle after the repair dries.
For leather, do not sand the top surface unless the repair kit instructions call for it. Sanding can remove the grain and make the repair more visible.

How to repair a torn cloth car seat
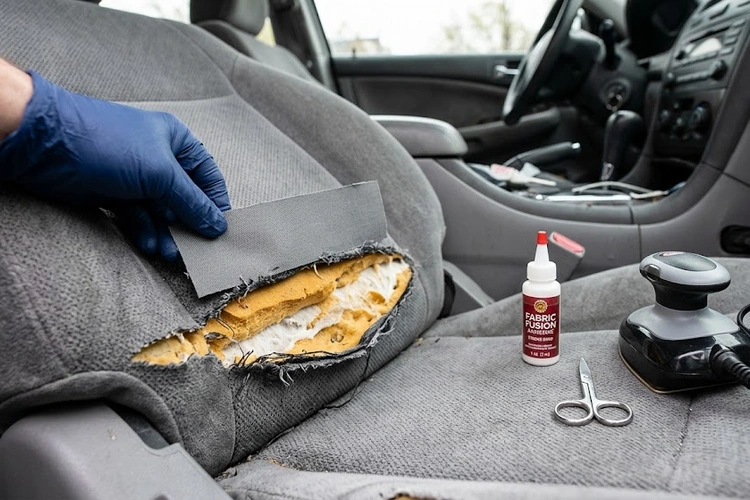
A small cloth tear is usually repaired with a backing patch and careful stitching. A patch under the tear gives the weak area support. Stitching alone can cause the fabric to tear again.
Step 1: Cut a backing patch
Cut a piece of matching or similar fabric. Make it large enough to extend at least about ½ inch beyond the tear on every side.
Round the corners of the patch. Square corners can catch on clothing and may lift over time.
If the foam is visible, place the patch between the seat fabric and the foam. Use tweezers or a thin plastic tool. Do not push a sharp tool deep into the cushion.
Step 2: Hold the patch in place
Apply a thin layer of fabric adhesive to the patch. Press it under the torn edges.
Use only enough adhesive to hold the patch. Too much glue can soak through the fabric and leave a hard, dark mark.
Follow the adhesive label for drying time. Keep the seat empty while the adhesive sets.


Step 3: Stitch the tear
Thread a curved upholstery needle. Start inside the seat cover if possible so the knot stays hidden.
Use small, even stitches. A simple ladder stitch works well when the edges meet. Pass the needle from one side to the other, then pull the thread until the edges touch without puckering.
Tie off the thread on the underside. Do not place a bulky knot where it can press against the foam.
Step 4: Blend the surface
If the fabric has loose fibers, brush them gently over the repair. A small amount of fabric adhesive may hold loose fibers down, but test it first.
Do not use an iron, heat gun, or hair dryer on a car seat. Heat can damage synthetic fabric, foam, wiring, and seat sensors.
If the cloth is missing
A missing section needs a fabric insert, not just a line of stitches. Match the weave and color as closely as you can. For a large hole, replacing the complete upholstery panel often looks better and lasts longer than adding a small patch.

How to repair a torn leather or vinyl car seat
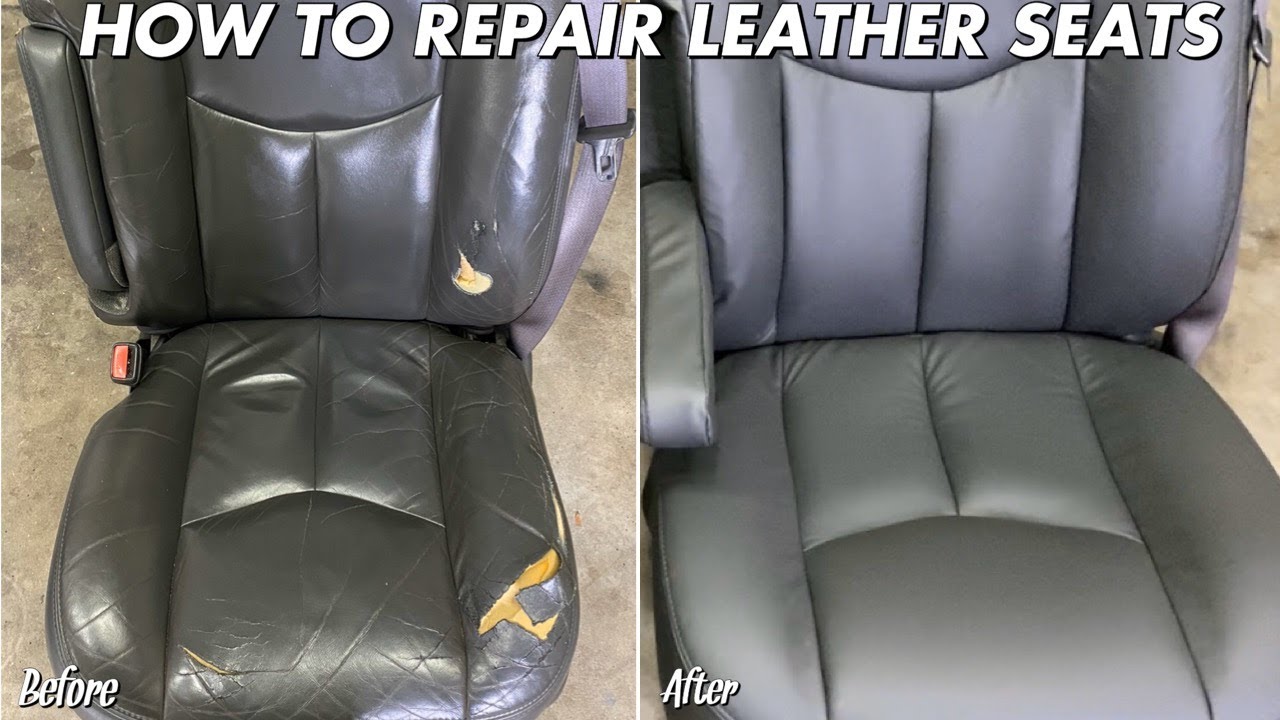
Leather and vinyl need a flexible backing patch and a repair compound. The compound fills the gap and helps match the surface color.
Step 1: Trim the tear
Cut away only loose or curled material. Keep as much original material as possible.
If the tear has clean edges, bring them together. If a section is missing, leave a small gap for the backing material and filler.
Step 2: Add the backing fabric
Slide the backing fabric under the tear. Center it so it extends beyond the damaged area.
Apply a small amount of repair adhesive to the underside of the torn edges. Press the edges onto the backing fabric. Use a cotton swab or plastic tool to spread the adhesive.
Let the adhesive cure as directed. Do not add filler while the adhesive is still wet unless the kit instructions allow it.
Step 3: Apply flexible filler
Spread a thin layer of leather or vinyl filler over the repair. Thin layers work better than one thick layer.
Let each layer dry before adding the next. Thick filler can shrink, crack, or remain soft below the surface.
Keep the filler level with the original surface. Avoid spreading it far beyond the tear because excess filler can change the texture of the seat.


Step 4: Recreate the grain
Some kits include grain paper or a grain pad. Press it onto the final wet layer, following the kit instructions.
The grain does not need to be perfect. A close texture is less noticeable than a smooth, shiny strip across a textured seat.
Step 5: Add color and protect the repair
Apply the color compound in thin coats. Blend it into the surrounding surface rather than stopping at a sharp edge.
Once the color cures, apply the recommended protectant. Use a product made for automotive leather or vinyl. Do not use household shoe polish, permanent marker, or paint.
Leather and vinyl are not the same
Leather can absorb some cleaners and conditioners. Vinyl has a plastic surface and needs a product made for vinyl. Using the wrong product may make the surface shiny, sticky, or slippery.
If you are unsure, check the vehicle owner’s manual or contact the seat material maker. A hidden-area test can prevent a larger stain.

How to repair a split car seat seam
A split seam is different from a hole. The material may still be strong, but the thread has failed.
First, remove loose thread with a seam ripper. Do not cut sound fabric. Align the original stitch holes when possible.
Use a curved needle and upholstery thread. Sew through the existing holes with small stitches. Keep the tension even. If you pull too hard, the old holes may widen.
For a seam that keeps opening, place a narrow strip of backing fabric under the seam. This spreads the load across a wider area.
Do not sew through a factory airbag seam. Front seatback seams may be designed to open during side-airbag deployment. If the split is on the outer side of a front seatback, stop and seek professional advice.

How long does a car seat repair take?
A small repair may take 30 minutes to several hours, depending on the material and drying time. The hands-on work may be short, but adhesives and fillers often need more time to cure.
| Repair type | Typical work level | Main limit |
|---|---|---|
| Small cloth tear | Low | Matching fabric |
| Simple split seam | Low to medium | Access to the seam |
| Small leather tear | Medium | Color and grain match |
| Large hole | High | Missing material and foam |
| Airbag-area damage | Professional | Safety design |
| Heated-seat damage | Professional | Wiring and electrical parts |
These are planning estimates, not guarantees. The kit instructions, temperature, humidity, and seat condition can change the time.
Do not sit on the repair until the adhesive or filler has fully cured. Early use can pull the edges apart and leave a permanent mark.

Common mistakes that make the damage worse
Avoid these common shortcuts:


Using super glue
Super glue dries hard. A car seat bends and flexes. The hard glue can crack the material or create a sharp spot.
Sewing a large hole without support
Stitching places stress on the edge of the tear. Without a backing patch, the needle holes can spread.
Using household duct tape
Tape may hold the material for a short time, but heat, friction, and body movement can loosen the adhesive. It can also leave residue that makes a proper repair harder.
Applying too much filler
A thick layer may look smooth at first. It can later shrink or crack. Several thin coats are safer for the finish.
Ignoring the airbag label
The outer edge of a front seatback is a common location for a side airbag. Do not cover, sew, glue, or tightly wrap that area without checking the vehicle service information.
Disconnecting the battery without instructions
Some vehicles have seat-mounted airbags, occupancy sensors, power seats, or belt tensioners. Disconnecting parts without the correct procedure can set a warning light or create a safety risk.
Using seat covers as a blind fix
A seat cover may hide damage, but it must not block a side airbag. Use only a cover approved for the exact vehicle and airbag layout.

When to hire an auto upholstery professional
Professional repair is the better choice when the damage affects safety, structure, or a large visible area.
An upholstery shop can remove and replace a complete seat panel. A qualified technician can also inspect foam, wiring, heating elements, sensors, and airbag seams.
Ask for a written estimate before work begins. The estimate should state whether the shop will:
- Repair the existing cover
- Replace one upholstery panel
- Replace the full seat cover
- Replace damaged foam
- Inspect the airbag seam
- Repair or test a heated-seat circuit
- Match the original color and grain
A repair may be worth doing when the seat is otherwise sound. Replacement may make more sense when the cover is brittle, the foam is crushed, or several seams are failing.
How to tell whether the repair worked
Check the repair before using the seat normally.
A good repair should have:
- Edges that lie flat
- No sharp thread ends
- No loose patch corners
- No hard lumps under the cover
- No strong chemical odor after curing
- No exposed foam, wire, or metal
- No blocked seat controls
- No airbag label covered by adhesive or stitching
- No new dashboard warning light
Sit down slowly and shift your weight. The repair should flex without opening. Do not test it by jumping on the seat or pulling hard on the patch.


Inspect it again after a few days of normal use. If the tear grows, the patch lifts, or the material cracks, stop using that repair method.

Frequently asked questions
Can I repair a car seat without removing it?
Yes, many small tears can be repaired while the seat remains in the vehicle. This works best for exposed, easy-to-reach areas. Do not remove trim or reach beneath the seat if you may disturb wiring, sensors, airbags, or seat belt parts.
Can I use a sewing machine on a car seat?
A sewing machine can repair a removed upholstery panel, but it is not a good choice for a tear that remains on the seat. The seat’s shape makes machine access difficult. A curved upholstery needle gives better control for small repairs.
Is leather repair filler safe on vinyl seats?
Only use a product labeled for vinyl or for both leather and vinyl. Leather-only products may not bond well to vinyl or may have the wrong flexibility.
Can I repair a torn seat with duct tape?
Duct tape is a temporary cover, not a durable upholstery repair. It may leave adhesive behind and can fail in heat. Use a proper backing patch and repair material instead.
Should I replace the seat if the tear is near an airbag?
Do not decide based on appearance alone. Have the seat inspected by the vehicle manufacturer’s service department or a qualified auto upholstery shop. The correct repair may involve replacing a seat cover with a factory-compatible airbag seam.
Final recommendation
Repair a small tear yourself only when it is away from airbags, seat belts, wiring, heating elements, and structural parts. Use a backing patch for cloth, and use flexible filler with a backing fabric for leather or vinyl.
If the tear is large, sits on a front seatback airbag seam, or exposes electrical parts, stop the DIY repair and seek professional service. A clean seat matters, but the seat must still work as part of the vehicle’s safety system.