

To jump start a car, connect a charged battery with jumper cables, start the donor car, and remove the cables safely.
Learning how to jump start a car can save time, money, and stress when your battery dies in a parking lot or driveway. The process is simple when you use the correct cable order, protect both vehicles, and confirm that a jump start is safe for your car. This guide explains the tools, steps, safety checks, common mistakes, and what to do if the engine still will not start.

What You Need to Jump Start a Car
Before you learn how to jump start a car, gather the right tools and check the situation. Rushing to connect cables can damage sensitive electronics or cause a dangerous spark.
You will need:
• A set of heavy-duty jumper cables with clean, undamaged clamps
• A working vehicle with a fully charged 12-volt battery
• A vehicle with a weak or dead 12-volt battery
• Safety glasses and work gloves, if available
• A flashlight if you are working at night
• Your vehicle owner’s manual
Park the donor car close enough for the cables to reach, but do not let the vehicles touch. Both vehicles should be in park or neutral with the parking brakes set. Turn off the ignition, lights, radio, climate control, and other electrical items.
A jump starter pack is another useful option. It does not need a second vehicle, but it must be charged and rated for your engine size. A small pack may work for a compact car but struggle with a large truck or diesel engine.

Check Whether a Jump Start Is Safe
A jump start is not the right answer for every no-start problem. First, inspect the battery and surrounding area. Do not continue if the battery is cracked, leaking, swollen, frozen, or giving off a strong rotten-egg smell.
A damaged battery can release flammable gas or corrosive acid. Connecting jumper cables may create a spark, which can lead to fire or an explosion. Call roadside assistance or a qualified mechanic instead.
Also stop if you see:
• Burned or melted battery cables
• Loose battery posts
• Heavy corrosion that hides the terminals
• Sparks, smoke, or heat from the battery
• A battery that is frozen in very cold weather
• A warning in the owner’s manual against jump starting
Some cars have the battery in the trunk, under a seat, or in another hidden area. Many newer vehicles provide special positive and negative jump points under the hood. Use those points when the manufacturer lists them. Do not guess.
Hybrid and electric vehicles need extra care. Some have a small 12-volt battery that can be jump started, but their high-voltage systems require special procedures. Never connect jumper cables to orange high-voltage cables or parts.
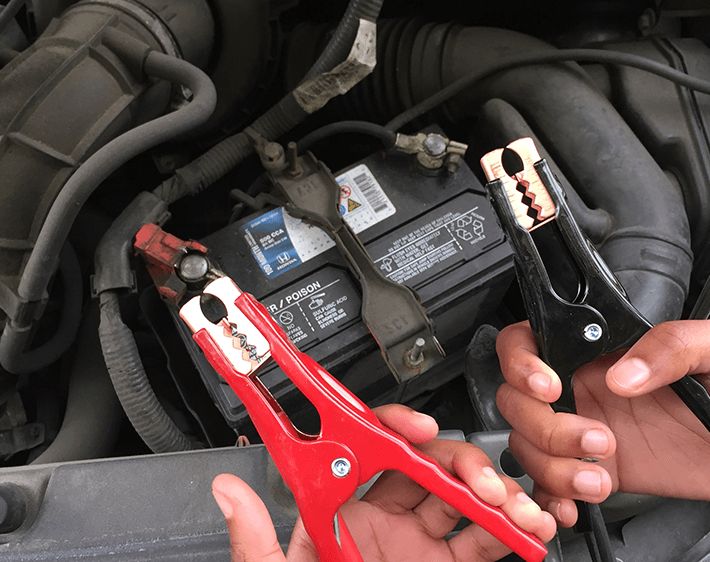
How to Jump Start a Car With Jumper Cables
Follow this order carefully. The order helps reduce the chance of a short circuit or spark near the battery.
1. Position the vehicles
Park the donor vehicle close to the car with the dead battery. Keep the vehicles from touching. Set both parking brakes and place both transmissions in park. For a manual transmission, place both cars in neutral.
Open both hoods and locate the batteries or approved jump terminals. Remove any plastic covers from the terminals. Check the positive and negative markings before you connect anything.
2. Turn both vehicles off
Switch off both ignitions. Remove the keys or keep the key fobs away from the vehicles. Turn off headlights, radios, fans, heated seats, and phone chargers.
This step reduces electrical load and protects vehicle systems. Some manufacturers give different instructions, so follow the owner’s manual if it differs.
3. Connect the red cable to the dead battery
Take the red jumper cable. Attach one red clamp to the positive terminal of the dead battery. The positive terminal usually has a plus sign and may have a red cover.
Make sure the clamp grips clean metal. Do not let the red clamp touch the car body or any other metal part.
4. Connect the other red clamp
Attach the other red clamp to the positive terminal of the donor battery. Check that it is secure and cannot slip off.
5. Connect the black cable to the donor battery
Attach one black clamp to the negative terminal of the donor battery. The negative terminal usually has a minus sign and may connect to a black cable.
Keep the loose black clamp away from the positive terminals and metal parts.
6. Ground the dead vehicle
Attach the final black clamp to an unpainted, solid metal part of the engine block or chassis on the car with the dead battery. Use a designated ground point if the owner’s manual provides one.
Do not place this final clamp directly on the negative terminal of the dead battery unless the manufacturer specifically says to do so. A remote ground helps keep any spark away from battery gases.
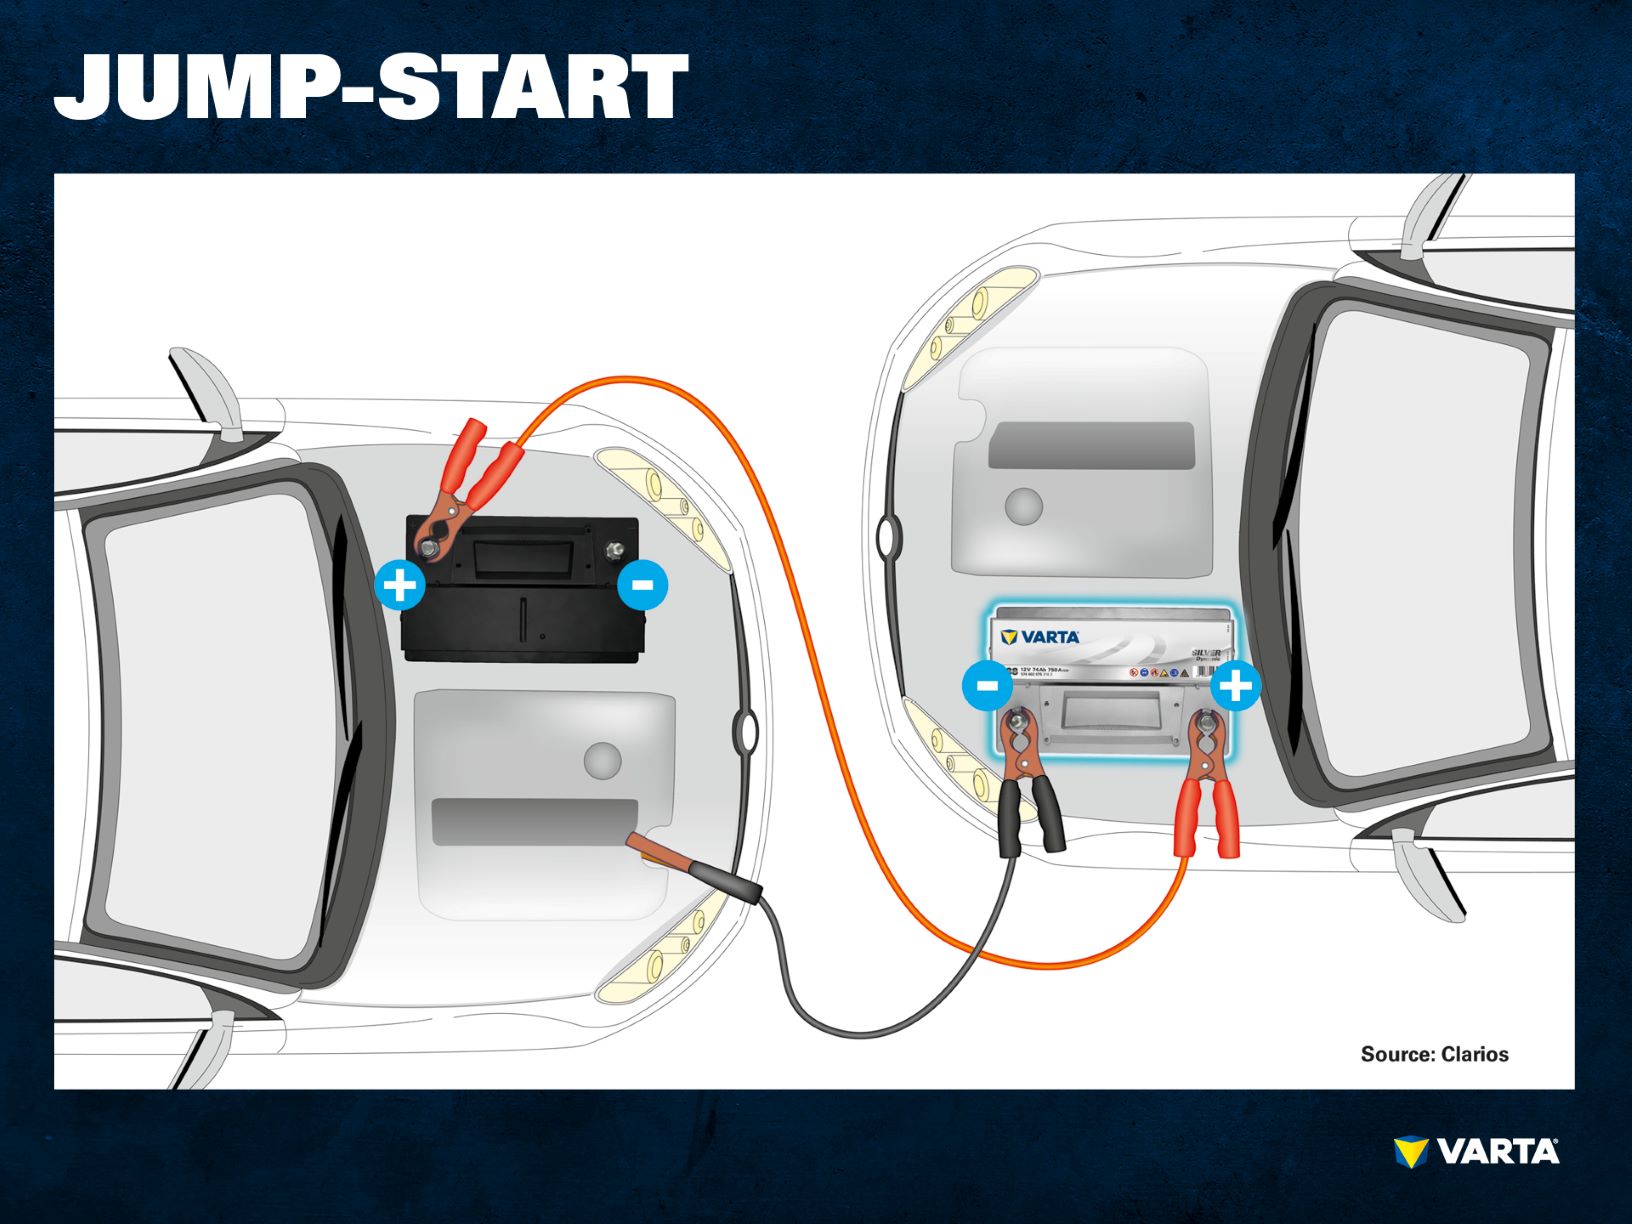
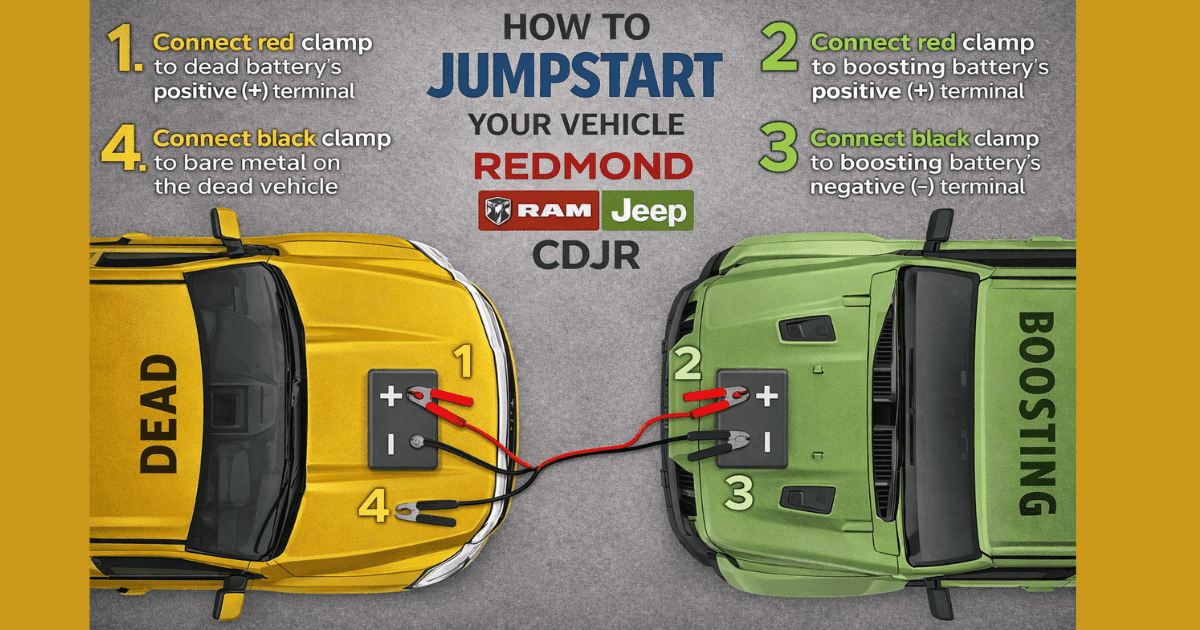
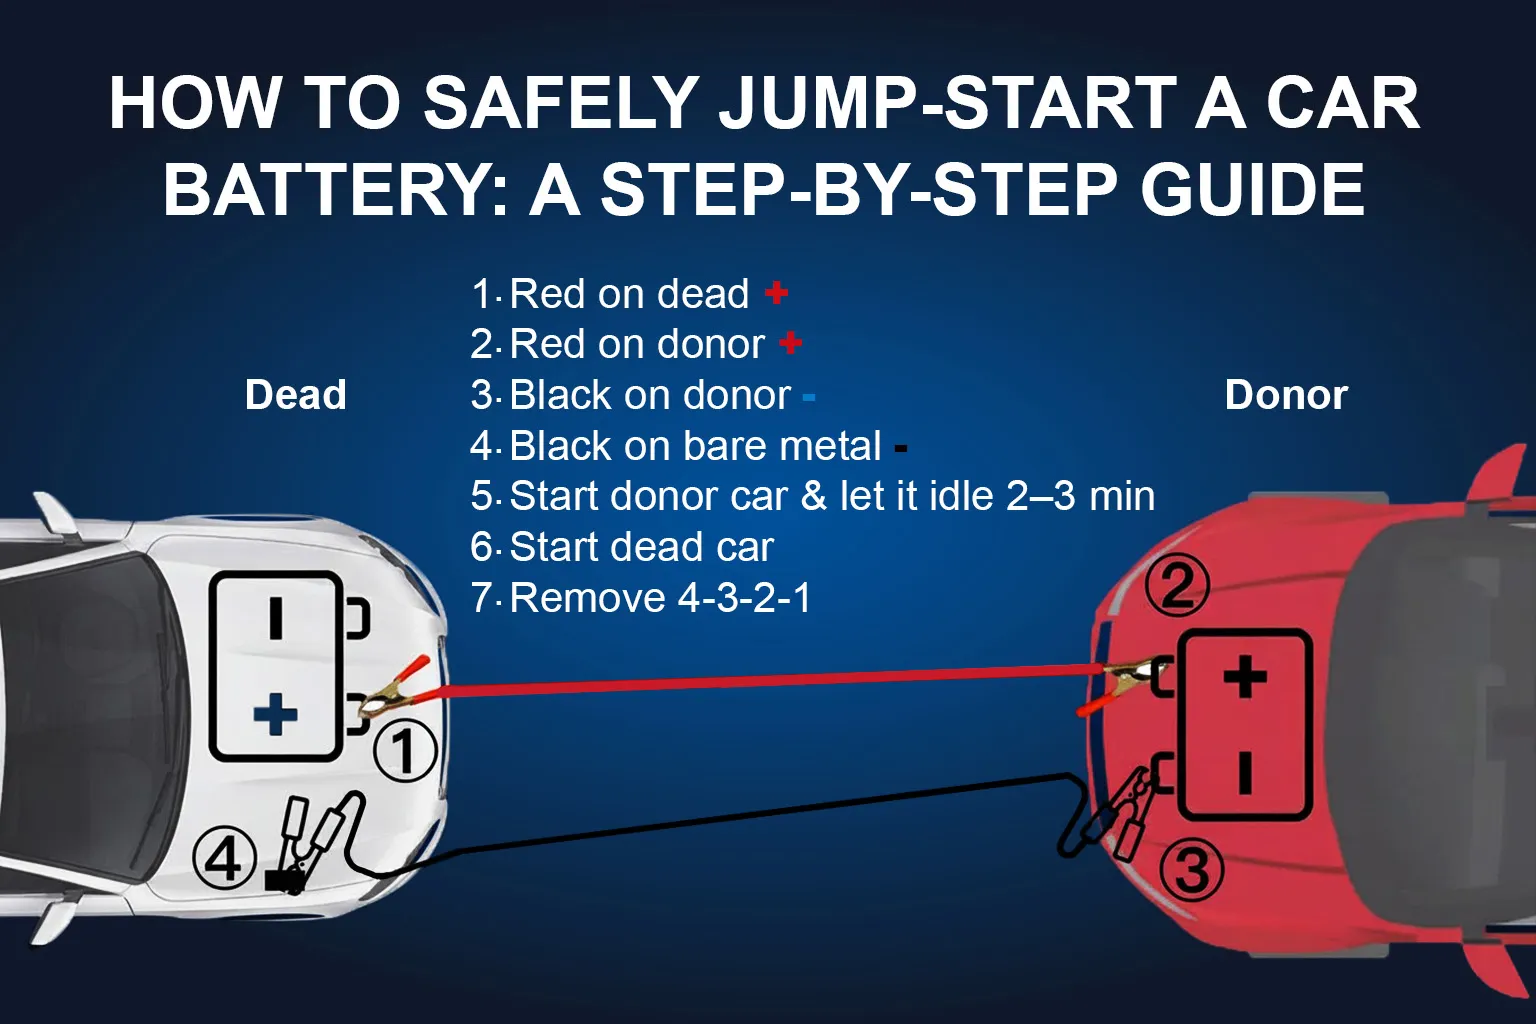
The connection order is:
Red clamp to the dead battery positive terminal
Red clamp to the donor battery positive terminal
Black clamp to the donor battery negative terminal
Black clamp to an unpainted metal ground on the dead vehicle
7. Start the donor vehicle
Start the vehicle with the good battery. Let it run for about two to five minutes. This allows some charge to move through the cables.
Do not race the engine. A steady idle is usually enough. Revving the engine can place extra stress on the charging system and does not guarantee a better result.
8. Start the vehicle with the dead battery
Try to start the disabled vehicle. Crank the engine for no more than about five seconds at a time. If it does not start, wait 30 to 60 seconds before trying again.
If the engine turns slowly, let the donor car run for a few more minutes. If you hear only a click, hear rapid clicking, or get no response, there may be a deeper problem.
9. Remove the cables in reverse order
Once the dead vehicle starts, remove the cables carefully:
Remove the black clamp from the grounded metal on the revived vehicle
Remove the black clamp from the donor battery negative terminal
Remove the red clamp from the donor battery positive terminal
Remove the red clamp from the revived vehicle positive terminal
Do not allow the clamps to touch each other or any metal surface while they are connected. Close the hoods only after the cables are fully removed and stored.
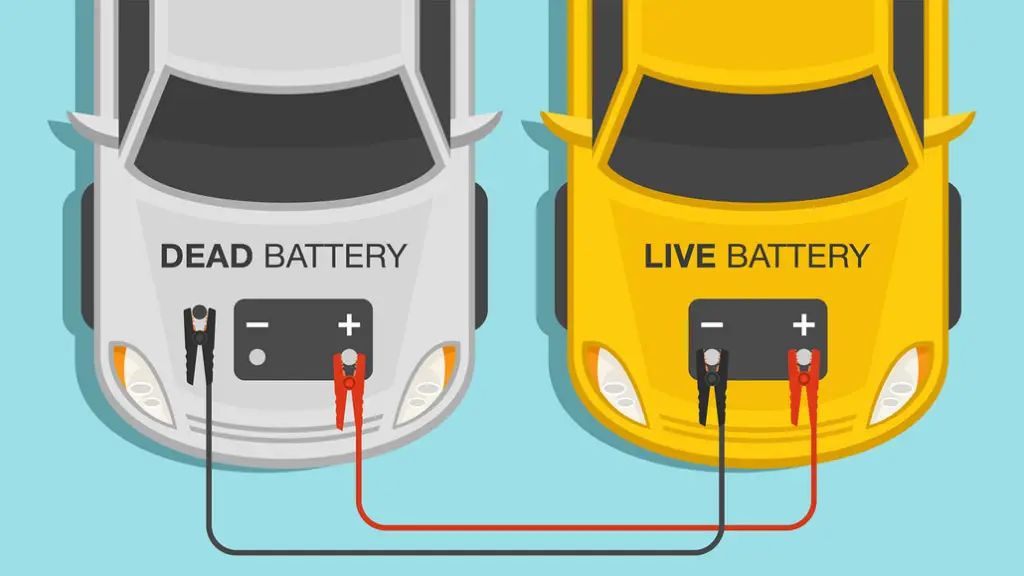
Why the Jumper Cable Order Matters
Jumper cables transfer electrical power between two 12-volt systems. The red cable carries positive power, while the black cable connects the negative side and provides a return path.
The final connection can create a small spark. Connecting the final black clamp to solid metal away from the battery helps keep that spark away from hydrogen gas that may be present around a charging battery.
Correct cable order also lowers the chance of reversing polarity. Connecting positive to negative can cause sparks, blow fuses, damage control modules, and harm the batteries. In severe cases, it can melt a cable or start a fire.
Think of the cable order as building a bridge one side at a time. Connect the positive side first, connect the donor negative second, and make the final ground connection away from the weak battery.

What to Do After the Car Starts
Starting the engine is only the first part of how to jump start a car. The revived battery needs time to recover, and the cause of the dead battery still needs attention.
Keep the vehicle running for at least 20 to 30 minutes, or drive it for that long when traffic and road conditions allow. A drive is usually more useful than leaving the car parked at idle because the alternator may charge more effectively while driving.
Turn off unnecessary electrical loads during the first part of the drive. Avoid switching off the engine until you reach a safe place where the car can be restarted.
Afterward, consider these steps:
• Test the battery’s voltage and starting strength
• Check the alternator and charging system
• Inspect the battery terminals for corrosion or looseness
• Look for lights or accessories that may have drained the battery
• Replace the battery if it is old, swollen, or unable to hold a charge
A healthy, fully charged battery often measures about 12.6 volts when the engine is off. A running vehicle may show roughly 13.7 to 14.7 volts, although readings vary by vehicle and charging strategy. Use a proper battery tester or ask a repair shop for a full test.
A jump start does not repair a weak battery. It only supplies enough power to start the engine. If the battery fails again soon, the battery, alternator, starter, or another electrical component may need service.
Common Mistakes When Jump Starting a Car
Many jump-start problems come from small errors. Taking one extra minute to check each connection can prevent expensive damage.
Reversing the connections
Never connect the red cable to a negative terminal or the black cable to a positive terminal. Look for the plus and minus symbols instead of relying only on cable color.
Connecting the final clamp to the wrong place
Avoid fuel lines, thin sheet metal, painted surfaces, fans, belts, and moving engine parts. Use a thick, unpainted metal bracket or the ground point recommended by the manufacturer.
Letting the vehicles touch
Vehicle contact can create an unwanted electrical path. Keep the cars close enough for the cables to reach but far enough apart that no body panels touch.
Using damaged cables
Do not use cables with cracked insulation, exposed wire, loose clamps, or melted sections. Thin, poor-quality cables may become hot and fail to carry enough current.
Cranking for too long
Long cranking can overheat the starter and drain both batteries. Use short attempts, then pause and inspect the connections.
Jump starting a frozen battery
A frozen battery can crack or explode when electrical current enters it. Let it thaw safely and inspect it before attempting a jump start.
Removing cables in the wrong order
Reverse the connection process. Removing the negative ground from the revived car first helps reduce accidental sparks around the battery.
Assuming every no-start means a dead battery
A car that clicks may have a weak battery, but it may also have a bad starter, poor battery connection, or electrical fault. If the engine cranks normally but does not start, the problem may involve fuel, ignition, or engine control systems.
How to Jump Start a Car With a Portable Jump Starter
A portable jump starter can help when another vehicle is not available. Choose a pack designed for your engine type and size. Read the instructions before an emergency, and keep the pack charged.
To use one:
Turn off the car and all accessories
Confirm that the jump pack is switched off
Connect the red clamp to the positive jump terminal
Connect the black clamp to the approved negative ground point
Turn on the jump pack
Start the vehicle with a short crank
Turn off the jump pack after the engine starts
Remove the black clamp first, then the red clamp
Some jump packs have reverse-polarity protection, but do not depend on it. Connect the clamps correctly every time.
Keep the pack away from extreme heat and check its charge every few months. A portable jump starter is useful, but it is not a replacement for a healthy battery or a working charging system.
How to Jump Start a Car in Bad Weather
Cold weather reduces battery performance and makes engine oil thicker. This is why a battery that worked yesterday may fail on a freezing morning.
Clear snow and moisture from the battery area before connecting cables. Keep the clamps dry, and do not work in standing water. If the battery is frozen, cracked, or swollen, do not jump start it.
In rain, use extra care but do not place the cables in puddles. A 12-volt vehicle battery normally does not create a dangerous shock risk through ordinary rain, but sparks, damaged wires, and poor connections can still cause injury or damage.
At night, use a flashlight rather than a lighter or open flame. Keep the work area away from cigarettes, sparks, and other ignition sources.
When a Jump Start Does Not Work
If you follow the correct steps and the car still will not start, stop repeating the process. More attempts will not fix a failed starter, broken cable, or damaged battery.
Use the sound as a clue:
• Rapid clicking often points to low battery voltage or poor terminal contact
• One strong click may suggest a starter or starter relay problem
• A slow crank may mean a weak battery, bad cable, or poor ground
• No sound at all may indicate a dead battery, disconnected cable, blown fuse, or ignition issue
• Normal cranking with no engine start may indicate a fuel, spark, or engine control problem
Check that all clamps are tight and attached to clean metal. If the donor vehicle is too small, its battery may not provide enough power. A compact car may not be a suitable donor for a large truck, van, or diesel vehicle.
Call roadside assistance if the car does not start after a few careful attempts. Professional technicians can test the battery, starter, alternator, and electrical system without guessing.
Expert Tips for Safer Jump Starts
After helping with roadside battery problems, one lesson stands out: preparation matters more than speed. People often keep jumper cables in the trunk but never check their condition or learn the correct connection order.
Use these practical habits:
• Read the owner’s manual before an emergency
• Store quality jumper cables in a dry case
• Keep a charged portable jump starter in the vehicle
• Clean battery corrosion with the correct safety gear
• Replace a battery that repeatedly loses power
• Check that interior lights and accessories switch off
• Avoid touching the clamps while they are connected
• Take a photo of the battery layout if it is difficult to identify the terminals
One mistake I often see is placing the black clamp on a painted bolt. The connection looks correct, but the paint blocks the electrical path. A clean, unpainted metal ground is much more reliable.
Another common mistake is turning off the revived car immediately after it starts. That may leave the battery too weak to restart. Let the vehicle run or drive long enough to reach a safe location first.
How Often Can You Jump Start a Car?
There is no fixed safe number of jump starts. A car can be jump started more than once, but repeated failures usually point to an underlying problem.
A single jump start after leaving the lights on is different from needing a jump every week. Frequent jump starts may indicate an aging battery, alternator trouble, parasitic drain, loose terminals, or a starter problem.
Have the charging system tested if:
• The battery dies again within days
• The battery warning light appears
• Headlights dim while driving
• The engine stalls after a jump
• The starter turns slowly even after a long drive
A qualified technician can perform a battery load test and alternator test. These tests provide more useful information than voltage alone.
Frequently Asked Questions About How to Jump Start a Car
Can I jump start a car in the rain?
Yes, you can usually jump start a car in light rain when the battery and cables are in good condition. Keep the connections away from puddles, avoid damaged wires, and follow the vehicle manufacturer’s instructions.
Which jumper cable goes on first?
Connect the red cable to the dead battery’s positive terminal first. Then connect it to the donor battery positive terminal, connect the black cable to the donor negative terminal, and attach the final black clamp to a grounded metal point on the dead vehicle.
How long should I let a car run after a jump start?
Let the vehicle run or drive for about 20 to 30 minutes. This may restore some charge, but a battery that keeps dying needs a proper battery and charging-system test.
Can I jump start a car with a hybrid?
Some hybrids have a normal 12-volt battery that can be jump started. Use only the approved 12-volt terminals and follow the owner’s manual; never connect to orange high-voltage cables or components.
Why does my car still not start after a jump?
The battery may be damaged, the cable connection may be poor, or the starter, alternator, fuse, or fuel system may have failed. Stop after a few careful attempts and seek roadside or professional help.
Can a jump start damage my car?
A correct jump start is generally safe, but reversed polarity, poor cables, or incorrect terminals can damage fuses and electronic control modules. Always verify the positive and negative markings before making a connection.
Conclusion
Knowing how to jump start a car gives you a useful emergency skill, but safety comes first. Use good cables, confirm that both systems are 12 volts, connect the clamps in the correct order, ground the final black clamp properly, and remove the cables in reverse order.
A successful jump start should be followed by a battery and charging-system check, especially if the problem happens again. Practice identifying the battery terminals, keep a jump starter or quality cables in your vehicle, and review your owner’s manual before you need help. Share this guide with another driver and explore more basic car care tips so you are ready for the next roadside surprise.