

A multimeter can reveal a car battery’s charge, health, and charging problems in just a few careful tests.
Learning how to test a car battery with a multimeter can save you a tow, prevent a needless battery replacement, and help you spot alternator trouble early. The process is simple, but accurate results depend on proper meter settings, clean connections, and testing the battery at rest and under load. This guide explains each step in clear terms, including voltage readings, safety tips, common mistakes, and what to do next.
What You Need to Test a Car Battery
You only need a few basic items to test a car battery with a multimeter. A digital multimeter is best because it gives a clear reading in tenths or hundredths of a volt.
Gather these items:
• A digital multimeter with DC voltage settings
• Safety glasses and work gloves
• A clean cloth or small wire brush
• The vehicle owner’s manual
• A battery charger, if the battery needs charging
Most automotive batteries are 12-volt lead-acid batteries. Some vehicles use AGM, gel, or other battery designs, but the basic voltage test is similar. Always check the battery label and vehicle manual before charging or testing a special battery.
A multimeter measures electrical potential. It does not fully measure battery capacity. A weak battery may show a normal voltage with no load, yet fail when the starter demands high current. That is why a complete check uses both resting voltage and a starting test.

How to Set Up the Multimeter
Before you test a car battery with a multimeter, set the tool correctly. A wrong setting can produce a false reading or, in rare cases, damage the meter.
Follow these steps:
Insert the black probe into the port marked COM.
Insert the red probe into the port marked V or VΩ.
Set the meter to DC voltage, shown as V with a straight line.
Choose the 20-volt range if the meter is not auto-ranging.
Keep the probes away from the current or amp port.
A car battery produces direct current, or DC. Do not select AC voltage. Do not place the red probe in the amperage port when checking battery voltage. That mistake can create a short circuit if the probe touches the battery terminals.
Before testing, inspect the meter leads. Cracked insulation, loose probe tips, or damaged wires can create a shock or short-circuit risk. Automotive battery voltage is not normally dangerous to touch, but the battery can deliver very high current and cause burns or sparks.

How to Test a Car Battery With a Multimeter
The most useful first test is a resting voltage test. It shows the battery’s state of charge after the surface charge has disappeared.
Step 1: Turn Off the Vehicle
Park on a level surface and switch off the engine. Turn off the headlights, radio, climate control, interior lights, and other accessories.
Remove the key from the ignition. On push-button vehicles, make sure the car is fully off. Some cars keep electrical systems awake for several minutes, so wait at least 15 minutes before taking a resting reading.
If you drove the vehicle just before testing, the alternator may have left a temporary surface charge on the battery. This charge can make a weak battery appear healthier than it is.
Step 2: Find the Battery Terminals
Locate the positive and negative battery terminals. The positive terminal usually has a plus sign and a red cover. The negative terminal usually has a minus sign and connects to the vehicle body or engine ground.
Clean away heavy dirt or corrosion before testing. You can test directly on the posts or on the terminal clamps, but testing the posts often gives a more accurate picture of battery voltage.
Step 3: Touch the Probes to the Terminals
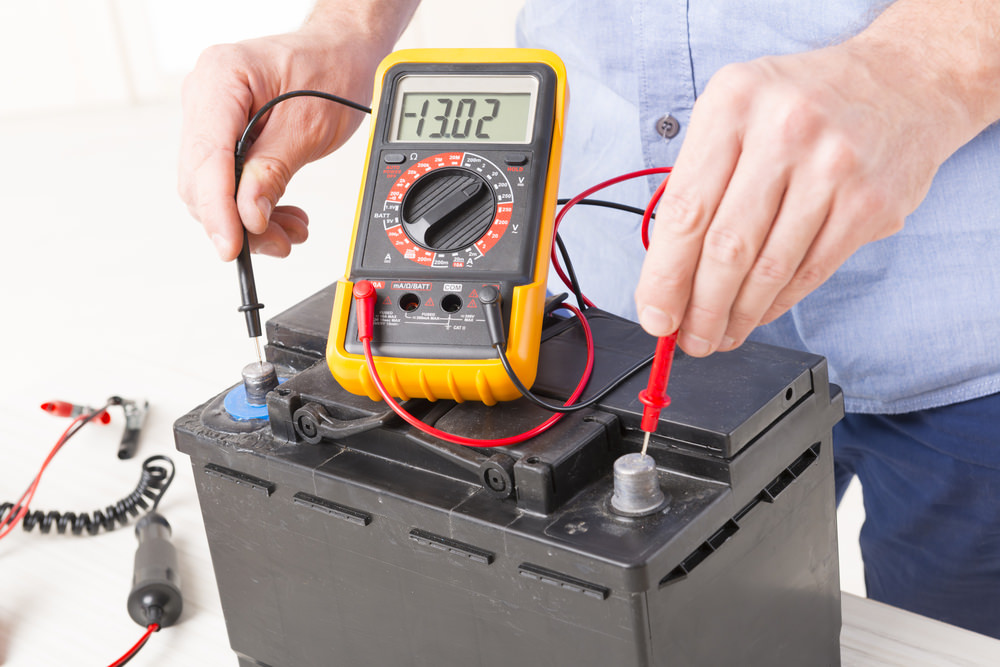
Touch the red probe to the positive terminal. Touch the black probe to the negative terminal.
Hold the probe tips firmly against clean metal. Do not allow the two probe tips to touch each other while they are connected to the battery.
Read the number on the display. A healthy, fully charged battery will usually show about 12.6 to 12.8 volts at room temperature when the engine has been off for several hours.
Step 4: Record the Reading
Write down the voltage and the time of the test. A single reading is useful, but a record helps you identify a slow drain or a battery that loses charge while parked.
For example, a battery that reads 12.6 volts after charging but drops to 12.1 volts the next morning may have a weak cell, a parasitic drain, or both.

Car Battery Voltage Chart
Use this chart as a general guide for a standard 12-volt lead-acid battery at rest. Temperature, battery design, and recent charging can affect the result.
| Resting voltage | Approximate charge level | General meaning |
|---|---|---|
| 12.6 to 12.8 volts | 100% | Fully charged |
| 12.4 volts | About 75% | Usable, but not fully charged |
| 12.2 volts | About 50% | Partly discharged |
| 12.0 volts | About 25% | Very low charge |
| Below 12.0 volts | Nearly discharged | Charge and test again |
A reading around 12.4 volts does not automatically mean the battery is bad. It may simply need charging. Charge it with the correct charger, allow it to rest, and test again.
A reading below 12 volts suggests a deeply discharged battery. Do not replace it based only on that number. A deeply discharged battery may recover, although repeated deep discharge can cause permanent damage.
Temperature also matters. Cold weather lowers battery voltage and reduces available cranking power. A cold battery can show a slightly lower reading than the chart suggests. If the battery repeatedly reads low at normal temperatures after charging, it deserves a professional load test.
How to Test Battery Voltage While Starting
A resting test cannot show how well the battery performs under the heavy load of the starter motor. The next step is to watch the multimeter while the engine starts.
Keep the meter connected:
Place the red probe on the positive terminal.
Place the black probe on the negative terminal.
Ask another person to start the engine.
Watch the lowest voltage shown during cranking.
A healthy battery often stays above about 9.6 volts during a short crank at approximately 70°F. Some vehicles and battery types may produce slightly different results. Very cold temperatures can lower the reading.
If voltage drops below 9.6 volts, the battery may be weak, discharged, or damaged. However, do not judge the battery alone. Corroded terminals, a poor ground cable, a failing starter, or thick engine oil can also cause a low cranking voltage.
If the engine barely turns and the meter drops sharply, stop repeated attempts. Excessive cranking can overheat the starter and drain the battery further. Charge the battery and repeat the test, or have the battery tested with a professional conductance or load tester.
In my own garage testing, one battery showed 12.5 volts at rest but fell below 9 volts during starting. The owner had already bought a new alternator, but the true problem was the battery’s internal damage. This is a good reminder that resting voltage alone is not a full battery health test.

How to Test the Alternator With a Multimeter
Testing charging voltage helps determine whether the alternator is restoring energy to the battery. This is an important part of learning how to test a car battery with a multimeter because a good battery can go flat if the charging system fails.
Start the engine and let it idle. Connect the probes in the same way:
• Red probe to the positive battery terminal
• Black probe to the negative battery terminal
A conventional charging system often shows about 13.7 to 14.7 volts with the engine running. The exact value depends on the vehicle, battery type, temperature, and charging strategy.
Turn on the headlights, blower motor, and rear defroster. The voltage may fall briefly, but it should generally remain near the vehicle maker’s expected charging range. If it stays close to battery voltage, such as 12.2 to 12.6 volts, the alternator may not be charging properly.
A reading above about 15 volts may indicate a voltage regulator problem or another charging fault. Excessive voltage can damage electronic modules and shorten battery life.
Modern vehicles often use smart charging systems. Their voltage may move up and down instead of staying at one fixed number. Some systems reduce charging voltage during cruising and increase it during deceleration. For these vehicles, use the specifications in the service manual rather than relying on one universal number.

How to Test for a Bad Battery Connection
Sometimes the battery is healthy, but power cannot move through dirty or loose connections. You can use a multimeter to find voltage loss across the terminals and cables.
With the engine cranking, place one probe on the battery’s positive post and the other on the positive cable clamp. A noticeable reading suggests resistance between the post and clamp.
Repeat the process on the negative side. Place one probe on the battery’s negative post and the other on the engine block or starter housing while the engine cranks.
A very small voltage drop is expected. A larger reading points to corrosion, a loose connection, or a damaged cable. The exact acceptable value depends on the vehicle and test method, but a drop approaching or exceeding about 0.2 to 0.5 volts on one cable deserves investigation.
Clean the terminals and tighten them properly. Do not scrape away so much material that the terminal becomes loose. Also inspect the engine ground strap and body ground connections.
A common mistake is testing only the battery posts when the actual problem is a loose cable clamp. The meter may show normal battery voltage, but the starter still receives too little current. Testing both the battery and the cable connections gives a much clearer diagnosis.

What Different Multimeter Readings Mean
Your result becomes more useful when you compare several tests. Use the following patterns as a guide.
Normal Resting Voltage and Normal Cranking Voltage
A reading near 12.6 volts at rest and above about 9.6 volts during starting usually suggests that the battery is in reasonable condition. If the vehicle still struggles to start, inspect the starter, cables, engine grounds, and fuel or ignition systems.
Low Resting Voltage but Good Cranking Voltage After Charging
This usually means the battery was discharged. Look for short trips, lights left on, long parking periods, or an electrical drain.
Normal Resting Voltage but Low Cranking Voltage
This pattern often points to a weak battery with reduced internal capacity. It can also indicate poor connections or a starter that draws too much current.
Low Voltage With the Engine Running
The alternator, voltage regulator, belt, wiring, or charging control system may have a problem. Check the belt and connections, then compare the reading with the vehicle’s service specifications.
High Voltage With the Engine Running
The charging system may be overcharging. Stop using the vehicle until the cause is checked, especially if lights are unusually bright, the battery smells like sulfur, or the battery case becomes hot or swollen.
Voltage That Slowly Drops While the Car Is Parked
This may indicate a parasitic draw. Some vehicle systems remain active after shutdown, so wait for the car to enter its sleep mode before testing current draw. Current testing requires a different meter setup and carries a greater risk of damaging the meter or vehicle electronics.

Safety Tips When Testing a Car Battery
Battery testing is simple, but the battery can release explosive hydrogen gas, especially during charging. Use care every time.
• Test in a well-ventilated area.
• Keep cigarettes, flames, and sparks away from the battery.
• Wear eye protection.
• Remove metal jewelry before working near the battery.
• Connect the red probe to positive and the black probe to negative.
• Never place a multimeter in current mode across the battery terminals.
• Do not test a battery that is cracked, leaking, swollen, or frozen.
• Keep tools from bridging the positive terminal and vehicle body.
• Follow the battery charger instructions for AGM or other special batteries.
If battery acid touches your skin, rinse the area with plenty of clean water. If it enters your eyes, flush them with water and seek medical care. A swollen battery should be replaced, not charged or tested repeatedly.
Common Mistakes to Avoid
Even experienced vehicle owners can get misleading results if they rush the process. These mistakes are especially common.
Testing Immediately After Driving
The alternator can leave a surface charge on the battery. Wait at least 15 minutes, and preferably several hours, for a more useful resting reading.
Using the Wrong Meter Port
The red lead belongs in the voltage port. Using the amp port across a battery can cause a short circuit and may blow the meter fuse.
Testing Only Once
A single voltage reading is just a snapshot. Test at rest, during cranking, and with the engine running.
Ignoring Corrosion
Corrosion increases resistance. It can make a good battery appear weak because the starter cannot receive enough current.
Replacing the Battery Too Soon
A low reading may result from a bad alternator or an electrical drain. Diagnose the entire starting and charging system before buying a replacement.
Repeatedly Cranking a Weak Battery
Several long starting attempts can drain the battery and heat the starter. Charge the battery first, then retest.
Trusting a Voltage Reading as a Capacity Test
A multimeter measures voltage, not reserve capacity or cold-cranking amps. A professional load or conductance test is more reliable when battery health is uncertain.
When to Replace the Car Battery
A battery may need replacement when it repeatedly fails a cranking test, cannot hold a charge, or has physical damage. Age also matters. Many automotive batteries last about three to five years, though climate, driving habits, vibration, and maintenance can shorten or extend that period.
Hot climates can speed up battery wear, while cold weather exposes a weak battery by demanding more starting power. Frequent short trips may also leave the battery undercharged because the alternator has little time to replace the energy used during starting.
Replace the battery if you see:
• A swollen or cracked case
• Leaking electrolyte
• Repeated voltage below 12.4 volts after proper charging
• A sharp voltage drop during cranking
• Failure during a professional load test
• Corroded or damaged terminals that cannot be repaired
Use the correct battery group size, terminal layout, reserve capacity, and cold-cranking rating for your vehicle. Some newer vehicles also require battery registration after replacement. This process tells the charging system that a new battery has been installed.
Frequently Asked Questions About How to Test a Car Battery With a Multimeter
Can I test a car battery without disconnecting it?
Yes. You can test voltage with the battery connected to the vehicle, as long as the engine and accessories are off for a resting test. Keep the probes from touching each other or nearby metal parts.
What voltage should a car battery show when the engine is off?
A fully charged battery usually shows about 12.6 to 12.8 volts after resting. A reading around 12.2 volts suggests roughly half charge, while a reading below 12 volts indicates a very low charge.
What voltage should a car battery show while the engine is running?
Many conventional systems show about 13.7 to 14.7 volts at idle. Smart charging systems can vary, so check the vehicle’s specifications before diagnosing a fault from one reading.
Is 12.2 volts enough to start a car?
It may start the car, but 12.2 volts means the battery is only partly charged. Charge it and test again before deciding that the battery needs replacement.
Can a multimeter tell me if my battery is bad?
A multimeter can identify low charge, poor cranking voltage, and charging problems. It cannot fully measure battery capacity, so a professional load or conductance test may be needed.
Why does my battery show 12.6 volts but still fail?
A battery can hold normal surface voltage while having damaged internal plates or low capacity. Watch the voltage during cranking and have the battery load-tested if it drops sharply.
Should I test the battery after driving?
You can test it, but the result may include surface charge from the alternator. For a resting test, turn the vehicle off and wait at least 15 minutes before measuring.
Conclusion
Testing a car battery with a multimeter starts with a resting voltage check, but the best diagnosis also includes cranking voltage, charging voltage, and cable voltage drop. A healthy battery commonly reads near 12.6 volts at rest, stays above roughly 9.6 volts during cranking, and receives suitable charging voltage while the engine runs.
Use the correct DC voltage setting, connect the probes safely, and avoid judging the battery from one reading. With these steps, you can separate a weak battery from a bad connection or charging fault and make a smarter repair decision. Try the tests carefully, record your results, and consult your vehicle’s service information when readings do not fit the normal range.