How To Inflate A Tubeless Tire: Easy Step-By-Step Guide
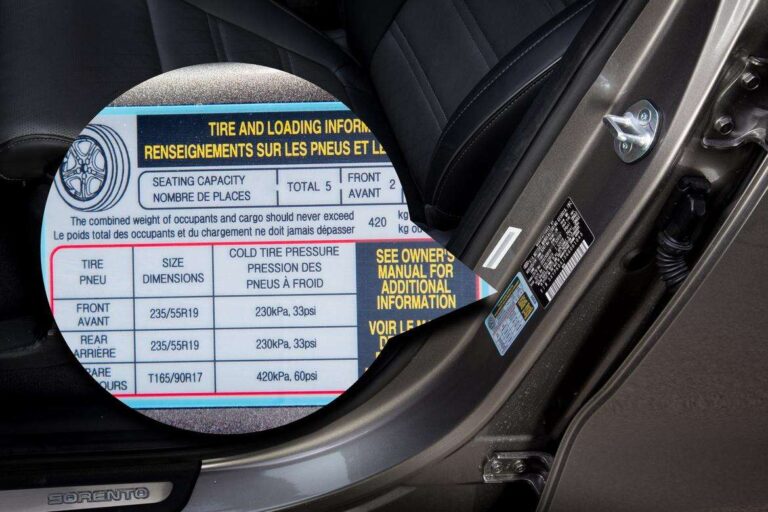
Inflate a tubeless tire by adding air through the valve stem, checking that the tire bead sits evenly on the rim, and setting the pressure listed for your vehicle, bike, or tire system. For a car or truck, use the cold pressure on the driver-door placard—not the maximum pressure molded into the tire sidewall. For a bicycle, follow the tire and rim maker’s pressure limits.
The main challenge is not adding air. It is making sure the bead seals against the rim. A tire that has come fully off the bead may need a high-volume burst of air, a special inflator, or help from a tire shop.
Introduction
Tubeless tires hold air without an inner tube. The tire bead locks against the rim, while an airtight valve seals the valve hole. Many bicycle, motorcycle, ATV, and passenger-vehicle tires use this design.
The steps are similar across the United States, but the correct pressure depends on the application. A passenger car may need a tire pressure listed on its door-jamb label. A mountain bike may use a much lower pressure based on rider weight, tire width, rim width, and terrain.
This guide explains how to inflate a tubeless tire, how to reseat a loose bead, what tools help, and when to stop and seek professional service.

What You Need Before Inflating a Tubeless Tire
Gather the right tools before you begin. The basic setup is simple:
- An air compressor, floor pump, hand pump, or portable inflator
- A reliable pressure gauge
- Valve-core tool
- Soapy water in a spray bottle
- Tire-safe bead lubricant
- Clean cloth or brush
- The vehicle, tire, or bicycle manufacturer’s pressure information
- An inflator with a large air burst for a loose bead
For a car or truck, a compressor with an air hose makes the job easier. For a bicycle, a floor pump may be enough when the tire is already seated. A tubeless tire that has lost its bead may need a compressor or a tubeless air tank.
Do not use oil, gasoline, starting fluid, or an open flame to seat a tire bead. These methods can cause a fire or explosion. Use only air and products made for tire installation.
Check the tire and rim first
Before adding air, inspect the tire for:
- A nail, screw, cut, bulge, or exposed cords
- A damaged or bent rim
- Dirt between the bead and rim
- A cracked valve stem
- A loose valve core
- Dried or leaking tubeless sealant on a bicycle tire
If you see sidewall damage, a large cut, a bulge, or exposed cords, do not inflate the tire for normal use. A tire professional should inspect it.
Find the correct pressure
Use the pressure source that matches your application:
| Application | Main pressure reference | Important limit |
|---|---|---|
| Passenger car or light truck | Driver-door placard or owner’s manual | Do not use sidewall maximum as the normal target |
| Motorcycle or ATV | Owner’s manual, tire maker, or vehicle label | Check pressure when cold |
| Bicycle | Tire maker and rim maker | Use the lower applicable maximum |
| Trailer | Trailer or vehicle maker’s specification | Account for load and cold pressure |
The number on a passenger tire’s sidewall is usually the tire’s maximum permitted inflation pressure under stated conditions. It is not normally the recommended pressure for your vehicle. The National Highway Traffic Safety Administration advises drivers to use the vehicle manufacturer’s recommended cold tire pressure.

How to Inflate a Tubeless Tire That Is Already Seated
If the bead is still touching the rim all the way around, inflation is usually straightforward.
1. Let the tire cool
Check pressure when the tire is cold. For a vehicle, this means checking before driving or after the tire has rested for several hours. Driving heats the air inside the tire and can produce a higher reading.
For a bicycle, avoid checking right after a long ride if you want a repeatable baseline.
2. Remove the valve cap
Unscrew the valve cap and set it somewhere clean. A missing cap does not usually cause a fast leak, but the cap helps keep dirt and moisture away from the valve.
3. Check the valve core
Press the valve core briefly or use a pressure gauge to confirm that air can pass through the valve. If the valve core is loose, tighten it gently with a valve-core tool.
Do not overtighten it. A damaged or overtightened valve core may leak.
4. Attach the pump or inflator
Push the chuck straight onto the valve. Lock it in place if the chuck has a lever. A poor connection can release air and give a false pressure reading.
If the tire has a removable valve core, keep the core installed for normal inflation. Remove it only when you need very high airflow to seat a loose bead.
5. Add air in short bursts
Inflate the tire in short bursts. Pause and check the gauge often. This helps prevent overinflation and lets you notice an air leak early.
For a vehicle, inflate to the cold pressure listed on the door placard. For a bicycle, stay within the tire and rim maker’s limits. If the tire maker gives a pressure range, choose a pressure that suits the rider, load, terrain, and handling needs.
6. Check the bead
Look at both sidewalls. Many tubeless tires have a molded bead line near the rim. That line should sit at a similar distance from the rim around the entire wheel.
A small change in the line can be normal near the valve or rim seam. A large dip, bulge, or section that sits deep in the rim shows that the bead may not be seated.
7. Check for leaks
Spray soapy water around:
- Both bead edges
- The valve stem
- The valve core
- Any puncture or repair area
Small bubbles that grow steadily indicate a leak. A few tiny bubbles from leftover soap do not always indicate a problem, so wipe the area and repeat the check.
8. Fit the valve cap and recheck
Once the tire holds air, install the valve cap. On a vehicle, recheck the pressure when the tire is cold. On a bicycle with tubeless sealant, rotate and gently shake the wheel so sealant can reach the inner surface, then inspect for leaks again.

How to Seat a Tubeless Tire Bead That Has Come Loose
A tubeless tire needs a fast flow of air when the bead has dropped into the center of the rim. A normal floor pump may move air too slowly to push the bead outward.
First, remove the wheel from the vehicle or bike if practical. Keep your hands, face, and body away from the sidewall while adding air. Never place your fingers between the bead and rim.
1. Remove the valve core if needed
A valve-core tool lets air enter faster. Remove the core only if the tire will not seat with the core installed.
Keep the valve core and cap in a clean place. Reinstall the core after the bead seats.
2. Apply bead lubricant
Apply a small amount of tire-safe bead lubricant around both bead edges. Soapy water can help in an emergency, but a proper tire lubricant is better for mounting work.
Do not use petroleum-based products unless the tire maker specifically approves them. Petroleum can damage some rubber and may reduce the seal.
3. Center the tire
Push the tire bead toward the rim’s center channel. This gives the bead more room to move outward when air enters.
If the tire has a removable valve core, place the wheel so the valve is at the top or side where the air hose can connect without being blocked. The best position depends on the wheel and tire design.
4. Use a high-volume air source
Use a compressor, tubeless tire inflator, or air tank designed for seating beads. Add air in a controlled burst while watching the bead.
You may hear one or two sharp pops as the bead moves into place. The sound alone does not prove that the tire is seated. Stop and inspect the bead line all the way around.
5. Do not exceed safe limits
Never keep increasing pressure simply because the bead has not seated. The tire maker may specify a maximum mounting pressure. If you cannot find that limit, stop and ask a tire professional.
A bead that will not seat may indicate:
- Wrong tire and rim size
- An incompatible rim profile
- A damaged bead
- A bent or corroded rim
- A tire that is too cold or stiff
- Dirt between the bead and rim
- A failed valve or air leak
- A tire that needs professional mounting equipment
6. Reinstall the valve core
After the bead seats, release the air, reinstall the valve core, and inflate to the correct pressure. Check the bead line and leak points again.
For a car or truck, a tire shop is the safer choice if the bead will not seat quickly. Large vehicle tires store substantial energy when inflated. Professionals have the correct restraints, tools, and procedures.

How to Inflate a Bicycle Tubeless Tire
Bicycle tubeless tires often need a slightly different process because they may use liquid sealant. The sealant helps close small punctures, but it does not replace correct mounting or a sound rim tape seal.
If the tire is already seated
Use a tubeless-compatible floor pump:
- Remove the valve cap.
- Check that the valve core is tight.
- Attach the pump head.
- Inflate to a pressure within the tire and rim limits.
- Rotate and shake the wheel to spread sealant.
- Check the bead and valve for leaks.
- Refit the valve cap.
A tire that loses air overnight may have a slow leak at the valve, rim tape, bead, or puncture site. Add sealant only if the sealant maker’s instructions and the tire system allow it.
If the bead has broken loose
A floor pump may not deliver enough air volume. Use a tubeless inflator, compressor with a regulator, or an air tank made for bicycle tires.
Remove the valve core if the inflator instructions allow it. Apply bead lubricant, make sure the tire bead is centered, and deliver a short burst of air. Once the bead catches, stop using the high-volume burst and install the valve core.
Do not ride until the bead sits evenly and the tire holds pressure. A partially seated bicycle tire can roll off the rim during a turn.

How to Inflate a Tubeless Car or Truck Tire
For a passenger vehicle in the United States, start with the tire pressure listed on the driver-side door-jamb label or in the owner’s manual. That specification is based on the vehicle’s design, load, and handling needs.
Do not lower the pressure to the sidewall number or raise it to that number just because it is printed in large type. The sidewall marking generally identifies a maximum pressure or load condition, not the everyday vehicle setting.
Follow this process:
- Park on a flat surface.
- Let the tire cool.
- Inspect for damage.
- Remove the valve cap.
- Attach a gauge or inflator.
- Add air to the vehicle’s cold pressure.
- Check the bead line and valve.
- Spray soapy water on suspected leaks.
- Replace the valve cap.
- Recheck all four tires, plus the spare if it has a listed pressure.
If the tire pressure warning light remains on after inflation, the vehicle may need to be driven for a short distance before the tire-pressure monitoring system updates. Some vehicles require a manual reset. Follow the owner’s manual.
A tire that repeatedly loses air needs repair or replacement. Frequent inflation is not a repair.

What to Do When a Tubeless Tire Will Not Hold Air
A tubeless tire that loses air has a problem at the tire, rim, valve, or puncture site. Find the leak before adding more pressure.
| Symptom | Likely causes | Safe next check |
|---|---|---|
| Air escapes at the valve | Loose core, damaged valve, poor valve seal | Tighten the core gently and use soapy water |
| Bubbles form around the bead | Dirt, damaged bead, bent rim, poor seating | Deflate, clean, inspect, and reseat |
| One puncture leaks | Nail, screw, cut, failed plug | Follow the tire maker’s repair rules |
| Tire loses air after adding bicycle sealant | Dry sealant, rim tape leak, valve leak | Rotate the wheel and test the valve and rim |
| Bead will not move outward | Low airflow, wrong size, stiff or damaged tire | Use the correct inflator or seek service |
| Tire looks uneven after inflation | Bead is not seated | Deflate and reseat before riding |
Never rely on a plug or sealant to repair every type of puncture. A puncture in a vehicle tire’s tread may be repairable under industry guidelines, but damage to the sidewall or shoulder is often not repairable. A qualified tire shop should make that decision.
For a bicycle, a temporary tube can help you get home if the tubeless system fails, but inspect the tire and rim before converting back to tubeless use.

Common Mistakes to Avoid
The most common mistake is using the wrong pressure target. The pressure on a car tire’s sidewall is not usually the same as the vehicle’s recommended cold pressure.
Other mistakes include:
- Checking pressure on a hot tire and adjusting it too low
- Using a damaged or inaccurate gauge
- Inflating before checking for a nail or cut
- Ignoring a bead line that is not even
- Using oil, ether, or flame to seat the bead
- Standing directly over the sidewall during bead seating
- Over-tightening the valve core
- Riding a bicycle before the bead is fully seated
- Assuming sealant repairs a large cut
- Forgetting to replace the valve cap
- Driving on a tire that repeatedly loses pressure
Do not inflate a tire that has visible structural damage. Do not attempt to mount an incompatible tire and rim combination. Tire and rim sizes may look close while using different bead-seat diameters, which can create a dangerous fit.
How Much Air Should You Put in a Tubeless Tire?
The correct amount of air is the pressure, measured in pounds per square inch, or PSI—not a fixed amount of air by volume.
Use these rules:
- Car or truck: Use the cold pressure on the door placard or in the owner’s manual.
- Motorcycle or ATV: Use the vehicle or tire maker’s specification, considering the load.
- Bicycle: Stay within the tire and rim limits, then adjust within the approved range for rider weight and terrain.
- Trailer: Use the pressure specified for the trailer tire and load.
As a simple example, if a vehicle placard says 35 PSI cold, inflate the tire to 35 PSI when cold. Do not set it to 44 PSI just because the sidewall says “maximum 44 PSI.”
Pressure changes with temperature. Air pressure usually rises as the tire warms and falls in cold weather. This is why vehicle manufacturers specify cold pressure and why checking at the same time of day improves consistency.

When Should You Ask a Professional for Help?
Ask a tire professional for help when:
- The bead will not seat with the correct equipment
- The tire has sidewall, bead, or shoulder damage
- The rim is bent, cracked, deeply corroded, or leaking
- The tire and rim sizes are uncertain
- The tire has been driven while badly underinflated
- A vehicle tire loses air again soon after inflation
- You need a repair rather than simple inflation
- You do not have a safe way to control the tire during bead seating
A tire that has been driven while flat may have hidden internal damage. It can look normal from the outside and still be unsafe. A professional inspection is the right next step.
Key Takeaways
- Use the correct pressure for the vehicle, bike, tire, and rim.
- Check vehicle tires when cold.
- Inspect for damage before adding air.
- Use a high-volume inflator only when a loose bead needs to be reseated.
- Keep your body away from the sidewall during bead seating.
- Never use fire, ether, gasoline, or oil to seat a tire bead.
- Confirm that the bead line is even around the rim.
- Treat repeated air loss as a leak that needs diagnosis.
Frequently Asked Questions
Can I inflate a tubeless tire with a regular pump?
Yes, if the bead is already seated and the valve accepts the pump head. A regular pump may not move air fast enough to seat a bead that has come off the rim.
Can I use soapy water to inflate a tubeless tire?
Soapy water does not inflate the tire, but it can help the bead slide into place and reveal leaks. Use a tire-safe bead lubricant when possible, and avoid petroleum-based products.
How do I know if a tubeless tire is seated correctly?
Check the molded bead line near the rim. It should sit at a similar distance from the rim around the wheel. If one section dips into the rim or bulges outward, deflate and reseat it.
Why does my tubeless tire keep losing air?
Common causes include a puncture, loose valve core, damaged valve, leaking rim tape, poor bead seating, or dried bicycle sealant. Use soapy water to locate bubbles, then repair the actual source.
Can I drive after inflating a tire that was completely flat?
Only after checking for damage and confirming that the tire is properly seated and holding pressure. If the tire was driven while flat, have a professional inspect it before normal driving.
Conclusion
Inflating a tubeless tire is usually easy when the bead is seated and the correct pressure is known. Add air through the valve, check the pressure with a reliable gauge, inspect the bead line, and test for leaks.
If the bead has come loose, use tire-safe lubricant and a controlled high-volume air source. Stop if the tire will not seat, the rim is damaged, or the tire shows structural damage. The safest next action is to follow the vehicle or tire maker’s pressure specification and have a tire professional inspect any persistent leak or seating problem.